Assemblies: Exploded Views
An exploded view spreads the parts apart so you can see how they fit. It is display only: the real placement of every component stays as it was. You need Pro to make or change one. Anyone who views the assembly can explode, collapse and animate it.
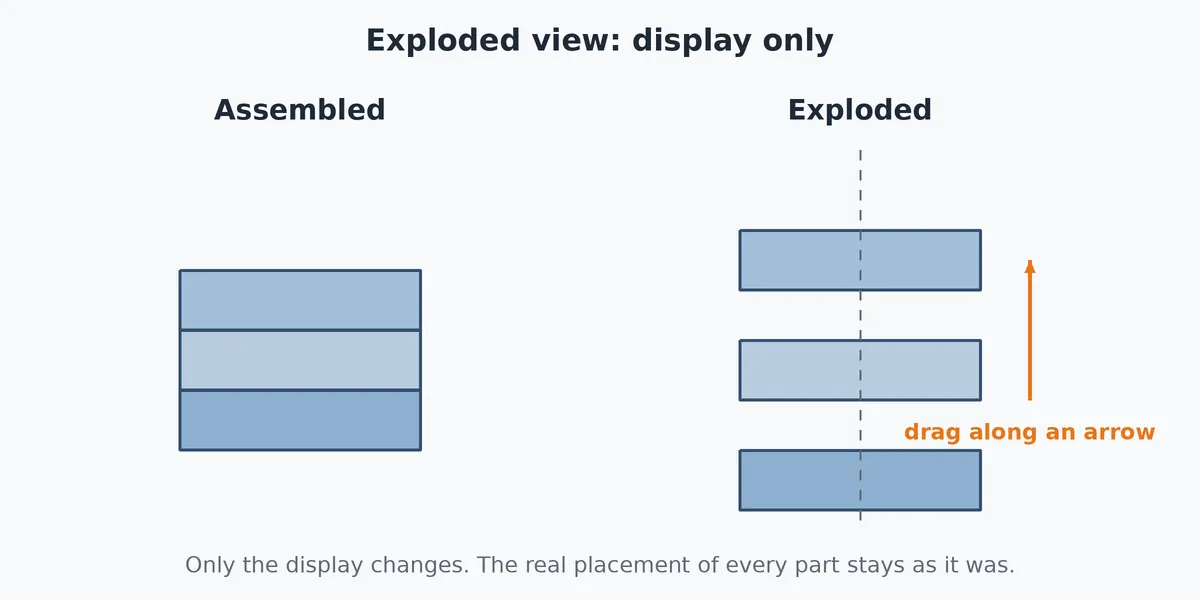
What you get: a named exploded view (ExplView1, ExplView2 and so on) in the Exploded Views folder, with the parts spread apart step by step; it shows, collapses and plays as an animation, and the real placement of the parts never changes.
One Editor, Beside the Model
Making a view and changing one happen in the same place: the Exploded View editor. It takes the place of the Model tree in the side panel while it is open (on a phone it comes up from the bottom like the other panels), so the model stays in full view. Done, the X or Esc closes it and the Model tree comes back.
- To make a new view, use Exploded View on the Features tab, or right-click the Exploded Views folder in the tree and choose New Exploded View....
- To change a view, double-click it in the Exploded Views folder, or right-click it and choose Edit.
The Views list at the top of the editor holds the same views as the tree, so you can move to another one without closing. A new view shows in the tree as soon as it has its first step.
Step by Step: Make an Exploded View
- Open the assembly. If it is exploded already, that is fine: a new view starts collapsed.
- Click Exploded View on the Features tab (Views group). The Exploded View editor takes the place of the Model tree, with a new view named ExplView1.
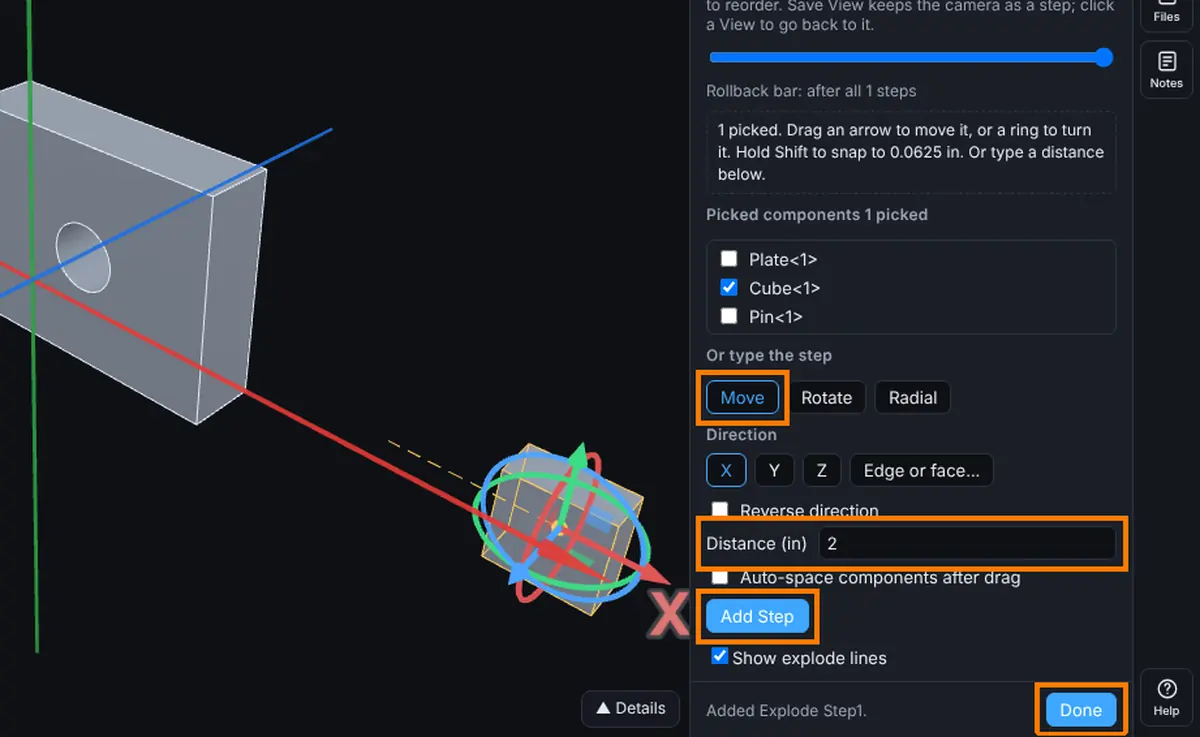
- Click a part in the view, or tick it under Picked components. A yellow box marks it and the triad appears on it.
- Under Or type the step, keep Move, click X, Y or Z under Direction, and type the Distance, for example 2.
- Click Add Step. The part slides out, a row named Explode Step1 appears in Explode steps (it reads, for example, Cube<1>: +X 2 in), and the line at the bottom says "Added Explode Step1."
- Pick the next part and repeat, or drag the triad's arrows instead (see Drag Parts Apart below).
- Click Done. The view is kept, listed in the Exploded Views folder with a Play button and Collapse.
Drag Parts Apart
- Click a part in the view. A yellow box marks it and the triad appears at its middle. Shift-click or Ctrl-click to pick more parts (click a picked one again with Shift or Ctrl to drop it). You can also tick parts in the Picked components list.
- Drag an arrow of the triad. The parts slide along that axis as you drag, and a readout by the pointer shows the distance in your units.
- Let go. That drag is one step, named for what it did, such as Move 3 components 120 mm along Z.
- Drag the same arrow again to carry on: the readout says Extends and the same step gets longer instead of a new step being added. Drag another arrow, or pick other parts, for a new step.
Drag a ring of the triad to turn the picked parts about that axis, through their middle. Hold Shift while dragging to move in 1 mm steps (1/16 in when the viewer shows inches) or turn in whole degrees. Press Esc while dragging to put everything back with no step made.
Type Exact Numbers
Under Or type the step, choose Move, Rotate or Radial:
- Move: pick a Direction (X, Y or Z, or Edge or face... and then click a straight edge or a flat face in the view), set Distance and, if you want, Reverse direction. Tick Auto-space components after drag and set a Spacing to space several parts evenly.
- Rotate: pick the axis and type Angle (degrees). The parts turn about that axis through their middle.
- Radial: pick the axis and type Distance. Each part moves straight away from that axis, which passes through the middle of the assembly.
Then click Add Step.
The Explode Steps
Each step is a row in Explode steps:
- Click a row to show the model as it stands after that step and to load the step into the boxes above (change them and click Update Step). Click it again to see every step.
- Double-click a step's name to rename it.
- Type a new distance or angle in the row's box and press Enter.
- Untick the row's box to suppress the step (it is skipped), and tick it to use it again.
- Drag the :: handle, or use Up and Down, to change the order. The steps play in list order.
- Click × to delete the step.
- Type a number of seconds in the row's s box to give that step its own time in the animation (0.1 to 60). Leave it blank to use the view's time for each step. The panel shows how long the whole explode takes.
Drag the Rollback bar slider to see the view after an earlier step; new steps go in at the bar. Tick Show explode lines for lines that trace each move. Click Done to keep the view: everything you did in the editor is one step on the undo list. If you close with changes that are not kept, you are asked to Keep Editing, Discard or Save.
Camera Views: Steps That Move the Camera
A view step is a camera shot saved in the step list, between the part steps. It never moves a part. Use it to tell the animation where to look.
- Turn the model to the angle you want.
- Click Save View (the camera button) beside the step list. A new row, View 1, goes in after the row you picked, or at the end.
- Do it again for the next shot. The rows are numbered in order.
A view row has a few tools:
- Move with next step is ticked to start. The camera glides to this shot while the next part step runs, so the part and the camera move together and the view step takes no time of its own. Untick it and the view step gets its own time, in the row's s box. The parts hold still while the camera moves.
- Re-save replaces that shot with the camera as it is now.
- Click the row to jump the camera to that shot.
- Drag the :: handle, or use Up and Down, to reorder. Rename, suppress and delete work as they do on part steps.
A view step before the first part step is the opening shot: the animation starts there. Nothing but Save View and Re-save ever records a camera, so turning the model never changes a saved shot. View steps count toward the 200 steps in a view.
Two Passes
An easy way to work:
- Build the explode first, with part steps only.
- Play it in the Animation Controller. Pause where you want a camera shot, turn the model, and click Save View. The shot goes in at that point of the explode, as one undo step.
- Play it again, pause at the next spot and save again.
Using a View
Each view in the Exploded Views folder has two buttons on its row: Play (the triangle) plays its animation in the Animation Controller, and Explode or Collapse shows it. You can also click Play Animation on the Features tab, beside Exploded View: it plays the view that is showing, or the only one, or asks which view to play.
Right-click a view in the tree for Explode or Collapse, Animate Explode, Animate Collapse, Show Explode Lines or Hide Explode Lines, Edit and Delete. The Animate window has Reverse, Pause and Play buttons, a speed list from 0.25x to 4x and a slider to scrub through the steps. Play Animation opens the Animation Controller, which turns the gears first and moves the camera as well, and Animation Settings... changes how it plays (see Animation Settings).
While the assembly is exploded you cannot move components or add mates. Collapse it first. An assembly can hold up to 20 exploded views, each with up to 200 steps.
Common Mistakes and Messages
- "Pick one or more components first." Add Step needs a part. Click one in the view or tick it under Picked components.
- "Type a distance other than zero." A step must move the part. Type a distance such as 2, 1/2 or 1 1/2.
- "An exploded view can hold up to 200 steps." Delete a step you do not need, or make a second view.
- "An assembly can hold up to 20 exploded views." Delete a view you no longer use (right-click it, Delete).
- "Collapse the exploded view to add mates." and "The assembly is exploded. Collapse it to move components." Collapse the view from its row in the tree, then mate or move.