Cut Paths and G-Code
Turns the sheets of your Nest into cut paths for a plasma or laser table: a G-code program for every sheet and a picture that shows where the torch goes and in what order. It is part of the Nest window and comes with Nest on the paid plans.
What you get: one G-code file per sheet (.nc, or .tap for Mach3 and Mach4), one picture (.svg) per sheet, and a summary of how many cuts there are and how many inches or millimetres of cutting.
Step by Step
- Run Nest first (see Nest). The cut paths are made from the last nest.
- In the Nest window open Cut paths (G-code).
- Pick your Control, and type your Kerf, Feed and Lead-in if they are not the defaults.
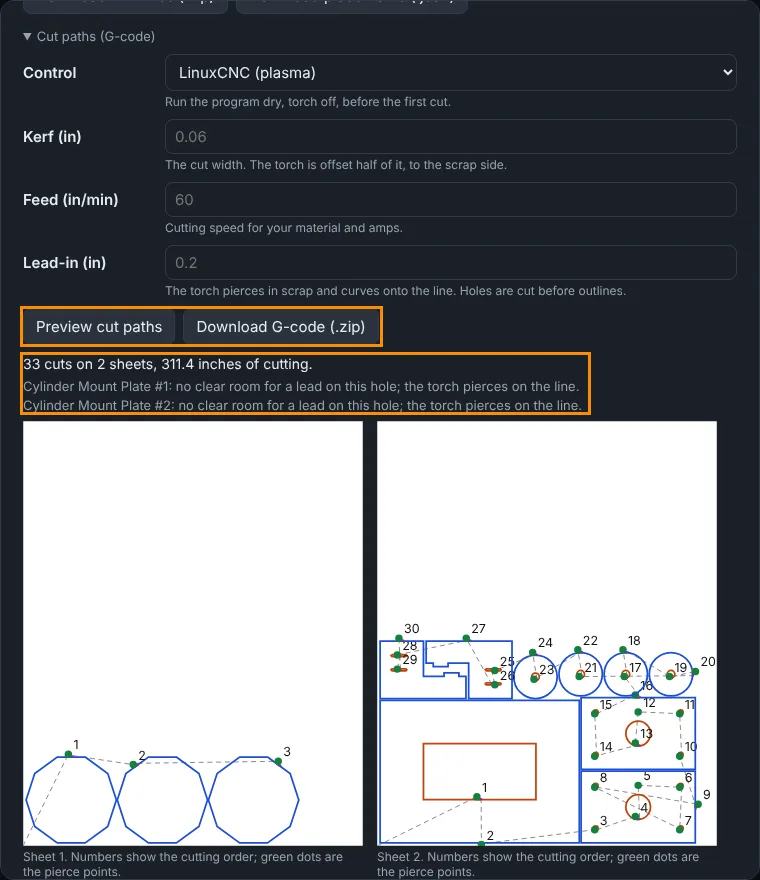
- Press Preview cut paths. Each sheet is drawn with numbers for the cutting order and green dots where the torch pierces. Blue lines are outlines, orange lines are holes, and the dashed grey lines are the moves between cuts with the torch off.
- Press Download G-code (.zip) to save the programs and pictures.
- Run the program dry, torch off, on your machine before the first cut. Check the heights and the feed for your material.
What the Program Does
- Kerf. The torch follows a line half a kerf away from the part edge, on the scrap side: outside an outline and inside a hole. The part comes out at its drawn size.
- Holes first. Every hole is cut before the outline of its own part, and a part sitting inside another part's hole is cut before that hole. Nothing is cut loose before the cuts that need it held still.
- Lead-ins and lead-outs. The torch pierces in the scrap and curves onto the line, so the pierce mark never lands on the part. A short lead-out leaves the line the same way. Choose arc or straight leads in the AI command. When there is no room for a lead, the torch pierces on the line and a warning says so.
- Direction. By default the good side of the cut is on the right of travel, so outlines run clockwise and holes counter-clockwise. The AI command can switch this to the left.
- Round holes are one arc, not a ring of short lines, so they cut smooth.
- Order. Cuts run from the sheet corner to the nearest next cut, so the torch does not cross the sheet more than it has to.
The Controls
- LinuxCNC (plasma) fires the torch with M3 $0 S1 and stops it with M5 $0 and does not move in Z.
- Mach3 or Mach4 uses M3 and M5 and moves Z to the safe, pierce and cut heights.
- Generic G-code uses M3 and M5 and no Z moves. Every program starts in a known state (inches or millimetres, absolute moves, no tool offsets) and ends with the torch off and M30.
Warnings You May See
- A hole too small to cut. A hole smaller than the minimum (0.12 in or 3 mm) is left out of the program and named in the warning, because the torch cannot cut it.
- No clear room for a lead. The hole or edge is too tight for a lead. The torch pierces on the line.
- The cut line runs past the sheet edge. A part is closer to the edge than half a kerf. Nest again with a bigger Edge margin.
- The space between parts is less than the kerf. Neighbouring cuts would overlap. Nest again with Space between of at least two kerfs.
The AI
An AI assistant connected to your account runs the same code with the fab.nest_gcode command: it returns the G-code of one sheet, or the picture, with the same warnings. It changes nothing.
Tabs
Tabs, also called microjoints, are short gaps left in the cut of a part's outline so the part stays held in the sheet and does not drop or tip into the torch path. Type how many in Tabs per part in the Cut paths section (0 cuts every part free, the default). The torch turns off, rides over the gap and fires again on the cut line, with the pierce delay, so each tab is one more pierce. The gap is 0.1 in (2.5 mm) wide unless the AI sets another width with tab_width.
- Tabs are spread evenly round the outline, on straight edges only, and never closer than a tab width and a half to a corner or to each other.
- Holes and round parts get no tabs. A round part is cut as one arc, so hold it another way. The warning says so.
- A part with no room for all the tabs gets fewer, and the warning says how many fit.
- After the cut, break or grind off the bridges. The preview shows each tab as a red ring.
Cut Tables
A cut table keeps your own kerf, feed and pierce settings for each material and thickness, so you do not retype them for every nest. Click Cut table... in the Cut paths section. Each row is a material (leave it empty for any material), the thinnest and thickest sheet it covers, the kerf, the feed, and optionally the pierce delay, the pierce height, the cut height and the mark feed (how fast the marker draws bend and etch lines). Nothing is filled in for you: use the numbers your own torch and material need.
- Each sheet of the nest is cut with the row that fits its material and thickness. A row that names the material beats a row for any material.
- Two rows for the same material cannot cover the same thickness.
- What you type in the Cut paths box (Kerf, Feed, Lead-in) still wins over the table.
- A sheet with no matching row uses the usual defaults, and the G-code header names the row used.
- Signed in, the table is kept with your account: it is the same on every computer and the AI reads the same rows. Signed out it stays in this browser only. A table you made before signing in moves to your account the first time you open it signed in, if the account has none yet.
- Export CSV saves the rows shown as a spreadsheet file in the unit you work in, and Import CSV... reads such a file back into the window (press Save to keep it). The first line names the columns and the unit. A file with a bad row is refused and the row is named, so a typo never replaces your table. Your numbers are never locked in.
- The AI reads the table with fab.cut_table_get and replaces it with fab.cut_table_set, which checks every row first. fab.cut_table_export and fab.cut_table_import do the same with CSV text.
Machine Time and Cost
The preview also says about how long the program runs the machine and, when you give a rate, what that costs: cutting at the feed, the pierce delay at every pierce (and again after each tab), the marking of bend and etch lines at the mark feed (when Bend lines is set to mark them), and the travel between cuts and to the marks at your machine's rapid speed, including the way back to the corner. Each part also gets its time and cost for one piece.
Open Cut table... and fill in Machine time and cost: your machine rate in dollars an hour and your rapid speed. Save machine settings keeps them with your account (in this browser when you are signed out; settings made before signing in move to the account the first time, if it has none yet). Nothing is filled in for you. With no rapid speed the travel is left out of the time, with no rate there is no cost, and the preview says so.
- It is an estimate. The machine slows for corners and arcs and lifts the torch between cuts, so the real program runs a little longer. In every release test the estimate is compared with the replayed program on the tube clamp kit: the cut length, the travel and the pierce delays agree.
- Download report (.csv) has the machine time under the nest report, one line for each part and one for the whole nest.
- In a quote, Add machine time (under Labor and margin, paid plans) adds one labor line for the nest at your rate, in hours.
- The AI reads the same numbers with fab.cut_time, which also hands back the labor line for a quote, and reads and sets your settings with fab.machine_get and fab.machine_set.
Bent Parts
A bent sheet metal part has bend lines on its flat pattern. They are never cut. Under Bend lines in the Cut paths section, Leave out (the default) writes a comment in the G-code that says how many bend lines are on the sheet and does nothing else. Mark with the marker output, torch off scribes every bend line first, before the first cut, with the marker commands of the control: LinuxCNC uses M3 $1 S1 and M5 $1, Mach3, Mach4 and generic use M7 and M9. These are placeholders, so change them to the commands of your own scribe or marker and run the program dry first. The preview draws the bend lines as purple dashes. The AI sets this with the bends option of fab.nest_gcode. For the order to bend in, see Bend Sheet.
Cut Order
The Cut order box sets the order the torch visits the parts. A part is always finished, holes first and then its outline, before the torch leaves it, and a part inside another part's hole is cut before that hole, whatever you pick. Shortest travel (the default) tidies the order of the parts, of the holes in a part and where each pierce goes, counting the way back to the corner, so the torch spends less time between cuts. The preview says how many inches of travel the sheet has. Spread the heat keeps the next part away from the last two cut, which helps thin sheet that warps when parts next to each other are cut one after the other; it costs more travel. Nearest next only is the plain walk from one pierce to the nearest next. The length of the cutting does not change with the order, only the travel.
Checked Output
The LinuxCNC and Mach3 files are replayed in an open source G-code interpreter (cncjs) in every release test, on a real kit of plates nested and cut with tabs: units, torch on and off, a cut half a kerf off every edge on the scrap side, and the tab gaps. That proves the program says what the plan says. No real table has cut from it yet, so run the first sheet dry with the torch off.
Common Problems
- The buttons are grey. There is no nest yet. Run Nest first.
- The program has a different feed than my table needs. Type your own Feed. The default is 60 in/min or 1500 mm/min, which is only a starting point.
- My control does not know M3 $0 S1. Pick Mach3 or Mach4 or Generic G-code.
- Parts tip or drop before the cut ends. Set Tabs per part to leave small gaps that hold each part in the sheet.