Split
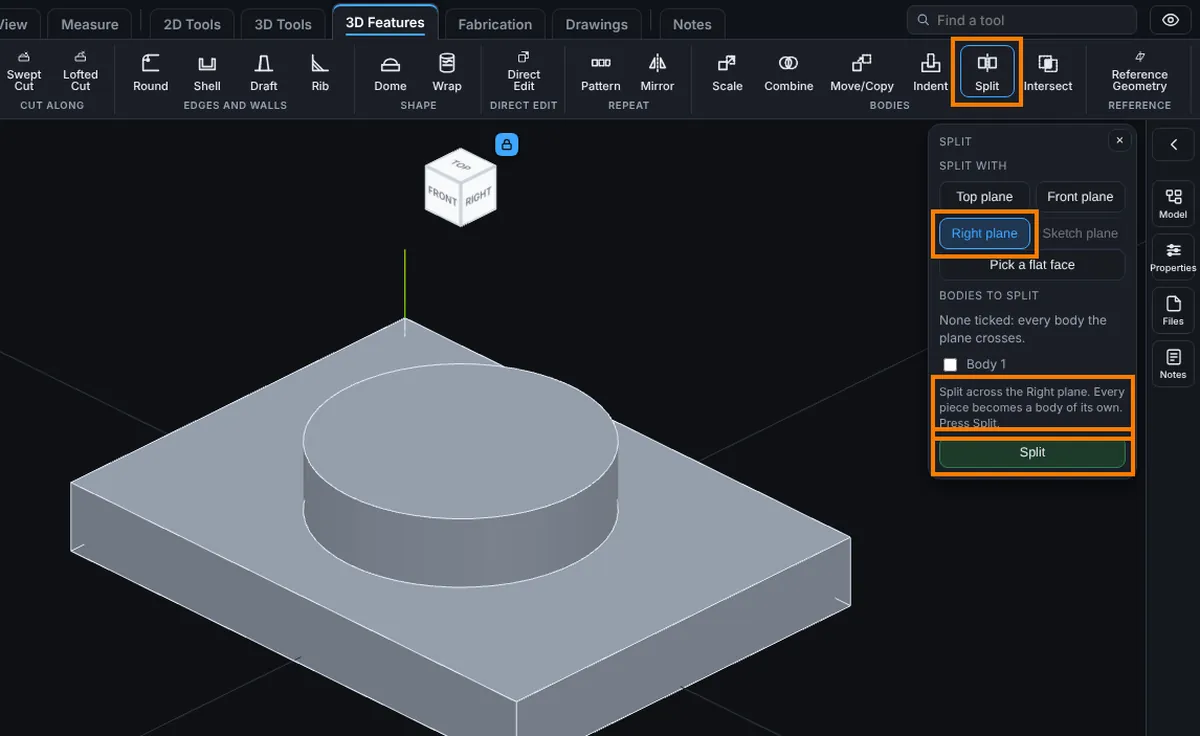
Cuts bodies with a plane into separate bodies and keeps every piece. Use it to cut a long part into two parts you can save, measure or move on their own, or to cut a part in half so you can work on one side.
What you get: each body the plane crosses cut into separate bodies, with no material lost, in one History step, and a message such as "Split across the Right plane."
When to Use It
- Cut a part that is too long for the machine or the truck into two parts
- Cut a part through the middle so each half becomes a body you can move, mirror or delete
- Cut off the end of a part as a body of its own, then delete it or keep it
How to Start It
Click Advanced on the Features tab, then Split. Modeling must be open (it comes with the Pro plans).
What to Pick
- Split with: the plane that cuts.
- Top plane, Front plane or Right plane: the three planes through the origin.
- Sketch plane: the plane of the sketch that is open (a face, or an offset plane). Open a sketch on it first.
- Reference plane: any plane you made with Reference Geometry (this list shows only when the part has one).
- Pick a flat face: press it, then click a flat face of the part. The plane of that face cuts.
- Bodies to split: tick the bodies to cut. With none ticked, every body the plane crosses is split.
A line under the list says what will happen.
Step by Step
- Click Advanced on the Features tab, then Split.
- Choose the plane: Top, Front, Right, the sketch plane, a reference plane, or press Pick a flat face and click a face.
- Tick the bodies to split, or leave them all unticked to split every body the plane crosses.
- Press Split. The result is one step in History.
What Happens to the Bodies
- Each body the plane crosses becomes two or more bodies. The piece on the side the plane faces (above Top, in front of Front, right of Right) keeps the body's name; every other piece gets the next free name, such as Body 2.
- No material is added or lost: the pieces together have the same volume as the body. A 10 mm cube split through its middle gives two bodies of 500 mm³ each.
- A body the plane does not cross, or only touches on a face, is left as it was.
- The pieces are separate bodies, so a later Extrude with Merge result does not join them. To join them again use Combine with Add.
Things to Know
- Split is refused in plain words, and the part is left as it was, when:
- the plane does not cross the part (or the ticked bodies), so there is nothing to split
- there is no part yet, or no plane was chosen
- the plane passes within 0.01 mm of a face, so one piece would be thinner than 0.01 mm
- the pieces would not make sound bodies, or would come to more than 400 bodies in all
- Split is a History step like any other: Undo takes it back, and in the Model tree you can suppress it, delete it or drag it to another place. To change the plane, delete the step and make it again.
- The bodies you tick are remembered by their exact size and place. If an earlier step changes one of them, this step stops and names the body rather than split a different one. With no body ticked, the step splits whatever the plane crosses when it is rebuilt.
- A model with a Split step stops at that step when it is opened in an older viewer that does not have Split.
Common Mistakes and Messages
- "There is nothing to split yet. Extrude something first." The part has no body yet.
- "The plane does not cross the part, so there is nothing to split. Pick a plane that passes through the part." The part is on one side of the plane.
- "The plane passes within 0.01 mm of a face of Body 1, so one piece would be thinner than 0.01 mm. Move the plane a little, or pick another." The plane runs along a face. Pick a plane further in.
- The plane does not cross the part: the part is on one side of the plane. Pick another plane, or make an offset plane through the part with Reference Geometry.
- Picking a face of the part did nothing to that body: the plane of a face only touches its own body. It splits the bodies that pass through that plane, such as a taller body beside it.