Boundary
Boundary makes a solid from two or more closed shapes, each drawn in its own sketch on its own plane. The solid runs from the first shape to the last in the order you list them, joined with a Smooth or a Ruled transition. It can be added to the part (Boundary Boss/Base) or cut out of it (Boundary Cut).
What you get: one solid that passes through every shape in the list, in order, added to the part or cut out of it, as one step in the Model tree.
When to Use It
- Make a duct, hopper or adapter that goes from one shape to another
- Make a faceted part with flat or straight-lined sides between the shapes, such as a tapered post, a chute or a pyramid frustum: choose Ruled
- Make a smooth flowing shape through three or more shapes: choose Smooth
- Cut a pocket or opening whose shape changes with depth
Step by Step
- Open a sketch on a plane and draw the first closed shape. Click Exit Sketch so it waits in the Model tree (see Exit Sketch).
- Make a second plane for the next shape. In the Sketch on panel type a distance in the Offset box before you pick Top, Front, Right or a face (see Reference Planes). Draw the second closed shape there and click Exit Sketch.
- Repeat for any more shapes. Each one needs its own plane.
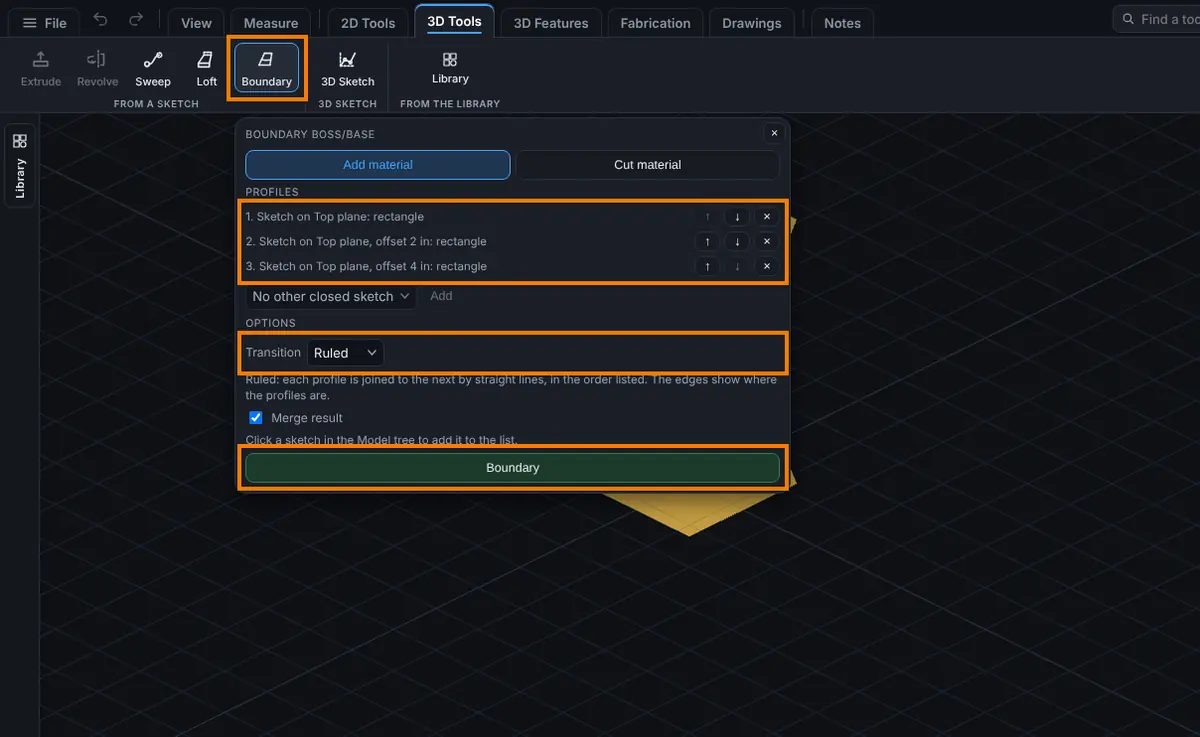
- Click Advanced on the Features tab, then Boundary. The panel heading reads Boundary Boss/Base.
- Choose Add material or Cut material. For a cut the heading reads Boundary Cut.
- Check the Profiles list. When the planes are parallel, the sketches are listed in order along them. Use the up and down arrows to reorder, the × to remove one, and the picker with Add to put another waiting sketch at the end. You can also click a sketch in the Model tree to add it.
- Pick the Transition: Smooth or Ruled.
- For Add material, leave Merge result ticked to join the body the solid touches, or untick it for a separate body.
- Watch the preview: yellow for added material, red for a cut. Click Boundary (or Boundary Cut). A message gives the new volume of the part.
Options
- Add material or Cut material: add the solid to the part, or remove it. A new part can start with a Boundary.
- Profiles: the shapes in the order the solid passes through them (Direction 1). The button needs at least two.
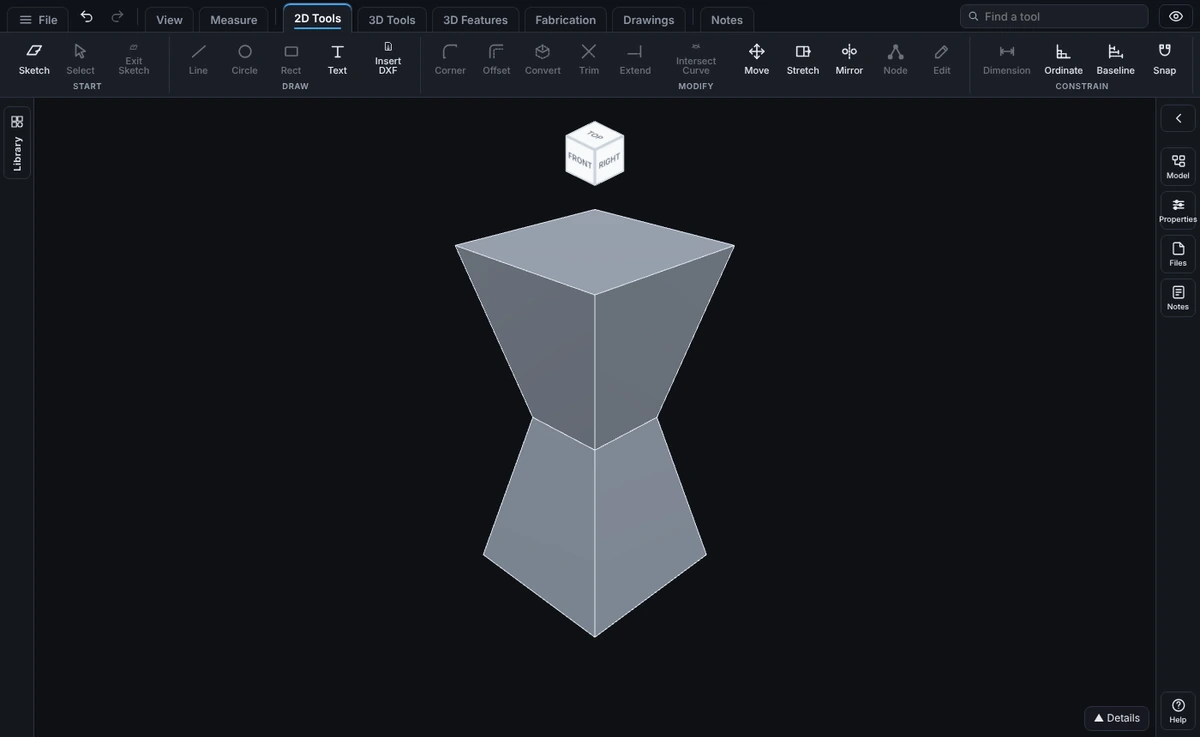
- Transition: Smooth runs one smooth surface through all the shapes, the same shape Loft makes. Ruled joins each shape to the next with straight lines, so the sides between two shapes are flat or straight-lined, and an edge shows at every shape in the middle.
- Merge result (Add material only): joined to the body it touches, or kept separate.
- Bodies to cut (Cut material only, parts with more than one body): see Extrude and Cut.
Edit It Later
Right-click the step in the Model tree and choose Edit Feature. You can reorder the profiles, change the Transition and change Merge result. To change a shape, right-click its sketch under the step and choose Edit Sketch. The step is named Boundary-Boss/Base, or Boundary-Cut for a cut, and its History row reads like Boundary, ruled, through 3 profiles. The sketches are used up when the step is made. Undo brings them back.
Tips and What to Expect
- With two shapes, Smooth and Ruled give the same solid. The choice matters with three or more.
- A 2 in square, a 1 in square 2 in above it and a 2 in square 4 in up make an hourglass. Ruled gives two straight tapers that meet at the middle shape; Smooth gives one curved waist.
- For the cleanest result give every shape the same number of sides, or use circles for all of them.
- The order matters. Reordering the list changes the shape, not only which way it reads.
- Pattern (In a row or Round an axis) and Mirror can repeat a Boundary step, just as they repeat a loft.
What It Does Not Do Yet
- Direction 2 curves (shapes that cross the profiles the other way) are not taken. Guide curves are not taken either: the Guide Curves list is hidden in the Boundary panel, and clicking an open sketch in the Model tree does not add one. Use Loft with guide curves when you need the sections steered.
- There is no tangency or curvature setting to faces next to the solid, at the start or the end.
- Each shape must be one closed outline. Open curves and surface results are not made.
Common Mistakes and Messages
- "A loft needs two or more profiles, each a closed shape in its own sketch." Add a second sketch to the list.
- "Each loft profile must be in a sketch of its own, on its own plane." Two listed shapes came from one sketch. Move one to its own plane.
- "Profiles 1 and 2 are on the same plane. Each loft profile needs its own plane (use an Offset plane)." Make the second plane with an Offset.
- "Profile 2 has an outline inside it. A loft profile must be one closed outline." Remove the inner outline.
- "The loft could not make a solid from those profiles. Check they are in order and do not cross each other." Reorder with the arrows, or redraw so the shapes sit one after another without crossing.
- "A boundary takes at most 50 profiles. Use fewer profiles, or split it into two boundary steps." Make it as two Boundary steps, the second starting where the first ends. Draw that shape again for the second step, since each step uses up its sketches.
- "A boundary transition must be Smooth or Ruled. Pick one in the Boundary panel, or in Edit Feature." The saved step lost its transition. Open Edit Feature and pick one.
- "A boundary does not take guide curves. Use Loft for guide curves, or remove them." The step was saved with guide curves. Make it again as a Loft, or without the guides.
- "The boundary added no material. The sketch may sit entirely inside the part." The solid lies inside the part already. Untick Merge result for a separate body, or move the shapes.
- "The cut removed no material." The Boundary Cut does not reach the part. Move the shapes so they pass through it.