The Toolbar Tabs
The toolbar across the top of the viewer puts the tools in the order the job goes: look at the part, measure it, sketch, make a solid, change it, and get it ready for the shop. It is the same for everyone, signed in or not, on every plan, on share links and on a phone. What a tool needs (your plan, an open STEP part) is the same on every tab.
Finding Your Way
- You want a tool and know which part of the job it belongs to: the tabs follow the job, left to right.
- You know the name of a tool but not which tab it is on: type it in Find a tool.
The Tabs
The tabs run in this order: View (the tab you start on), Measure, Sketch, Features, Fabrication, then Documents.
| Tab | What is on it |
|---|---|
| Sketch | Start (Sketch, Select, Exit Sketch), Draw (Line, Circle, Rect), Modify (Corner, Offset, Convert, Trim, Move (with Stretch inside it), Mirror, Edit) and Constrain (Dimension, Snap). Node, Extend, Intersect Curve, Ordinate, Baseline, Insert DXF and Text are in Advanced. |
| Features | Make a solid (Extrude, Revolve), Remove (Cut, Hole, Thread), Edges and walls (Fillet, Chamfer, Shell), Direct Edit, Repeat (Pattern, Mirror) and Library, which opens the Library drawer, and Make Drawing. Sweep, Loft, Boundary, 3D Sketch, Draft, Rib, Dome, Wrap, Indent, Modeled Thread, Scale, Combine, Split, Intersect, Move/Copy, Reference Geometry, Swept Cut and Lofted Cut are in Advanced. While an assembly is open this tab is named Assembly and holds the assembly tools (the Sketch and Fabrication tabs step aside until you right-click a part and choose Edit Part) (Insert, Move, Rotate, Edit Part, New Part, Mate, the patterns, Configurations, Display States, Exploded View, Play Animation, and Interference, Clearance, Bill of Materials and Used Parts). |
| Fabrication | Half-Lap, Tab and Slot and the Cut List. |
| View | Full Screen, Fit, Views, Perspective, Redraw, X-ray view, Marks, Grid, Scene and Theme. |
| Measure | Measure (tap an edge, a round hole or a face and it picks the measurement), Point to Point, Gap, Angle, Hole Size, Mass Properties, Snap, Hide All and Clear All (the Measurements group) and the Display group (units and decimals). Edge Length, Area, Volume and Mass are in Advanced. |
| Documents | Notes (the Notes panel), Pin a Note, Discussion and Hide Pins; Make Drawing (the front, top and right views of the part on a sheet with a title block, to print or save as PDF or DXF) and Attached Files; Quote and Purchase Orders; Bill of Materials and Cut List; and Documents, the list of everything made from this model. |
Clicking Sketch, Features or Fabrication starts modeling when the part and your plan allow it. Switching between tabs never ends a sketch. On a wide screen the name of each group shows under its buttons, on every tab.
When a Tab's Tools Are Greyed
Clicking a tab always shows it. When modeling cannot start, the tab shows its tool buttons greyed, with one line saying why and what to do. You can still point at a greyed button to read what it does, and right-click it for its help page. The usual reasons:
- An assembly is open. "This is an assembly. To sketch on or change one of its parts, right-click the part and choose Edit Part." The Sketch and Fabrication tabs are not shown while the assembly tools are; while you edit a part that way the tabs come back and work as they do for any part. The Features tab keeps showing the assembly tools.
- The model is not a STEP part. Open the STEP file to use the tools.
- Your plan does not include modeling. Modeling is a Pro feature.
- A 2D drawing is open, an older version is on screen (switch back to the current version), or the model is still opening.
When the reason goes away the buttons light up and a press on any of them starts modeling.
Advanced
Each modeling tab keeps the everyday tools in front and puts the less common ones in an Advanced drawer at the end of the tab. You never need it to sketch, extrude, cut a hole or round an edge. When a job needs more, the tool is one click further, and it works exactly as it would on the tab.
Step by Step
- Click a modeling tab, for example Sketch. On a new part it first asks for a plane: click Top, Front or Right.
- Click Advanced, the last button of the tool strip (on Features it comes just before Library, at the end of the tab). A drawer of buttons opens beside it.
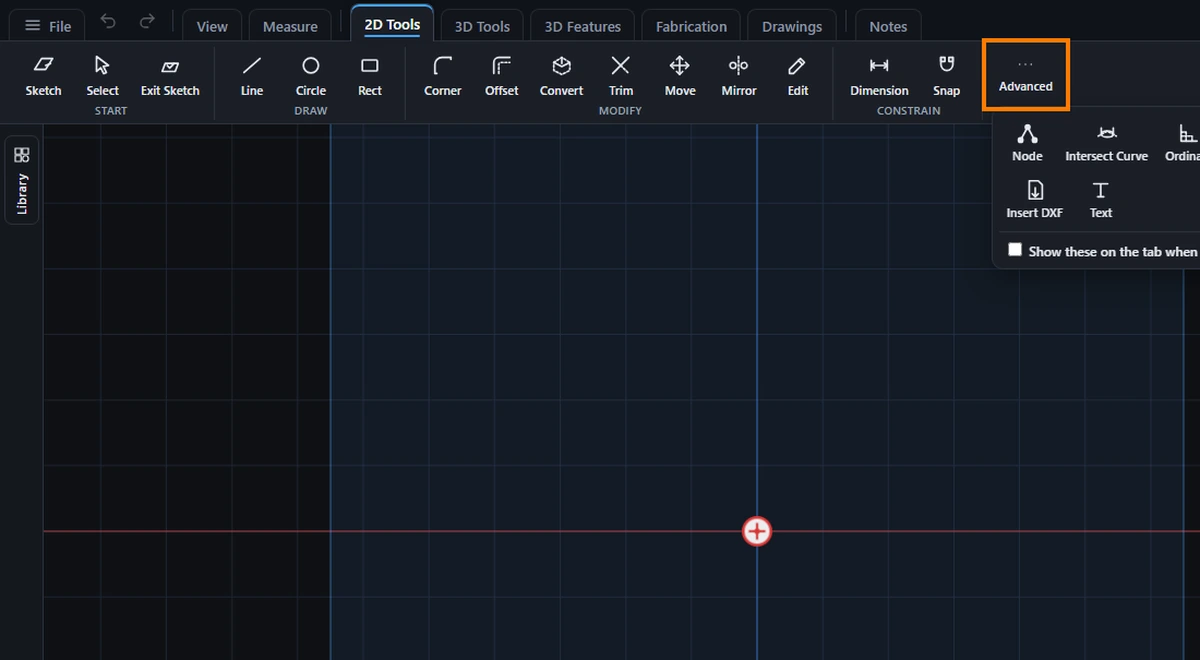
- Click the tool you want, for example Node (it moves a sketch point or adds one on a line; to snap to points use Snap). The drawer closes and the tool is armed. Advanced stays lit while a tool from it is in use.
- To keep every tool on the tab instead, open Advanced and tick Show these on the tab when there is room. Every tool then sits on the tab, and Advanced stays at its end with only the box inside; open it and untick the box to go back. The choice is remembered in this browser.
Common Mistakes and Messages
- A tool I used to find on the tab is missing. It moved into Advanced. Or type its name in Find a tool, which opens the right tab and starts it.
- I ticked the box and some tools are still in Advanced. When the window is too narrow for the whole tab, the least used tools go into Advanced anyway. Make the window wider.
- A tool in Advanced is greyed. It is greyed for the same reason as on the tab; see the list above.
Find a Tool
- Click Find a tool in the top strip (on a phone, the magnifier), or press / anywhere on the page (Ctrl+K, or Cmd+K on a Mac, also works, even while you type in a text box). The key is shown at the right end of the box.
- Type part of a name, or a word for what you want to do: fillet finds Fillet, notch finds Half-Lap, weight finds Mass.
- Click a result, or press Enter for the first one. The arrow keys move through the list and Esc closes it.
With nothing typed, the box lists the eight tools you started from it last, then every tool you can use, with a heading for each tab. It is the quickest way to see what exists without opening each tab.
The tool starts on its own tab: Find a tool switches tab for you, and opens modeling first when the tool needs it. Words are matched against each tool's name, its tab and the title and keywords of its help page. Tools your plan does not include still show the usual message when picked.
The Library Drawer
The narrow Library strip on the left edge opens the Library drawer; Library on the Features tab does the same. The drawer docks beside the model, so the model moves over rather than being covered. Close it with its X, the strip again, or Esc. Until the parts library is ready the drawer says the Library is coming soon. On a phone there is no strip; use Library on the Features tab, and the drawer opens over the model.
Things to Know
- Right-click any button, tab or Advanced for its help page, as everywhere else.
- Light and Dark themes both work with every tab.
- Before October 2026 the toolbar had five tabs: View, Measure, Sketch, Features and Notes. Since 6.389.0 the modeling tabs are Sketch and Features (they were briefly named 2D Tools and 3D Tools; the old names still work in Find a tool), Half-Lap and Cut List are on Fabrication, and Notes and Drawings are groups on Documents.