Up To Surface Walkthrough
A step by step example of Up To Surface: a block that ends on a face you click, stops short of it with an offset, and follows the face when the plate under it changes. For everything the end condition can do, see Up To Surface.
Before You Start
- Modeling comes with the Pro plans.
- Make a plate 4 in by 3 in and 1/2 in thick: draw a rectangle on the Top plane and Extrude it with a Depth of
1/2 in. - The examples use inches. Use any unit you like, and type it after the number.
Pick a Face
- Click Sketch, type
3 inin the Offset box and click Top (see Reference Planes). The sketch opens 3 in above the plate. Draw a rectangle 1 in by 1 in over the plate. - On the Features tab, click Extrude.
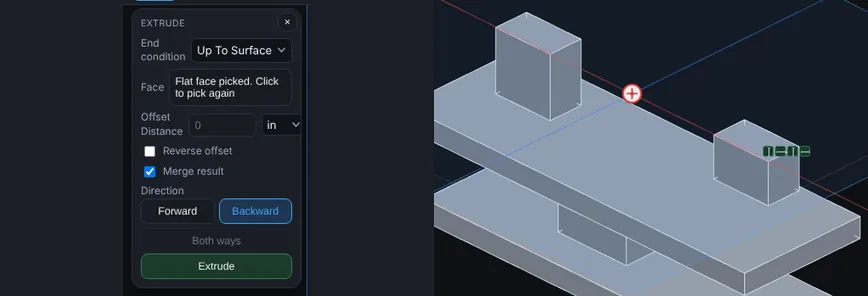
- In End condition, choose Up To Surface. The Depth box is replaced by a Face row, Offset Distance and Reverse offset.
- Choose Backward, so the feature runs down toward the plate. Both ways is greyed out.
- Click the top face of the plate. It lights up in blue, and the message says Flat face picked.
- Click Extrude. The block runs down and stops on the top face of the plate.
Stop Short of the Face
- Open a new sketch 3 in above the plate with a second rectangle beside the first.
- Click Extrude, choose Up To Surface, choose Backward and pick the same face.
- Type
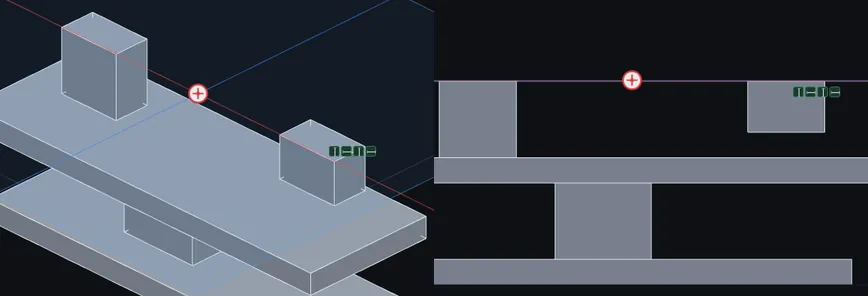
1/2 inin Offset Distance. - Click Extrude. The block stops 1/2 in above the plate, with a gap. The step reads up to surface, offset 1/2 in.
- To run through the face instead, tick Reverse offset and extrude again. The block goes 1/2 in past the face, into the plate.
Make the Plate Thicker
- In the Model tree, right-click the plate's step and choose Edit Feature.
- Change its Depth to
3/4 inand press Enter. - The part is rebuilt, and the face is found again. The block now ends on the new, higher top face, 1/2 in short of it if it has that offset. Its depth in the Model tree has changed by itself.
Change the Offset in Place
- Right-click the Up To Surface step and choose Edit Feature.
- Change Offset Distance to
1 inand press Enter. The gap grows to 1 in. - Press Esc to close the boxes.
When the Face Is Lost
- If an earlier step removes the face, the step shows a warning with this message: Up To Surface: the face it ends on is no longer on the part. An earlier step probably changed or removed it. Edit the step and pick the face again.
- Right-click the step, choose Edit Feature, click Pick face again and click the new face.
Options
- Face, Offset Distance, Reverse offset and Direction.
- Merge result for Extrude.
Tips and What to Expect
- A flat face can be at any angle. A cylinder or a sphere works too, and the face is carried on past its edges.
- The offset takes units and formulas, like every length box.
- Cut works the same way. It ends on the picked face's surface whichever body that face belongs to, and removes material only from the bodies in its scope.