Move Component
Moves a part of the assembly by dragging it or by typing how far. A part that is held by mates moves only the way its mates allow. Assemblies need the Pro plan.
What you get: the part moved by exactly the distance you typed (or where you dragged it), the line at the bottom of the window saying "Moved Cube<1>.", and one step on the undo list.
When to Use It
- Pull a part out to see how it fits
- Set a part roughly in place before mating
- Move a part by an exact amount, for example 1 1/2 in along X
- Test whether a part hits its neighbors while you drag it
Step by Step
- Click a component in the view or in the Model tree.
- Click Move on the Assembly tab (Components group), or right-click the component and choose Assembly tools, Move Component. The Move Component window opens and names the component.
- Choose a mode. For an exact move, click By Delta XYZ (each mode is described under Modes below).
- Type Delta X, Delta Y and Delta Z in your display unit, for example 1 1/2 in Delta X and 0 in the other two.
- Click Apply (or press Enter). The part moves and the line at the bottom says "Moved Cube<1>." with the part's own name.
- Click Done, the X, or press Esc to close the window.
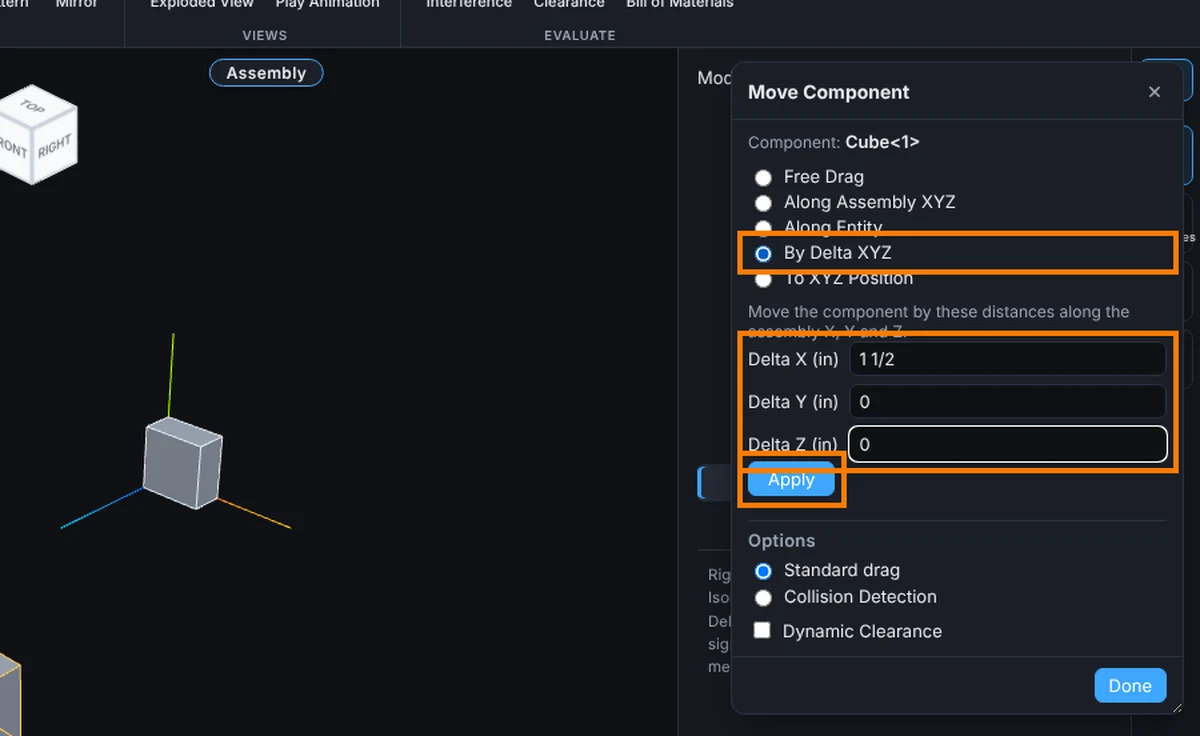
Modes
- Free Drag: drag the part with the left mouse button. It moves in the plane facing you.
- Along Assembly XYZ: click X, Y or Z, then drag. The part moves only along that axis, which is drawn in the view.
- Along Entity: click a straight edge (the part moves along it) or a flat face (the part moves in its plane), then drag the part. Pick another changes the entity.
- By Delta XYZ: type Delta X, Delta Y and Delta Z (for example 1 1/2) and click Apply (or press Enter).
- To XYZ Position: click a point on the part (it snaps to corners and edges), type the X, Y and Z it should go to, and click Apply. With no point picked, the part's own origin goes there. Clear the picked point starts over.
Options
The Options part of the window is shared with Rotate Component:
- Standard drag or Collision Detection. For collision choose All components or These components (then tick the ones to check against), and tick any of Dragged part only, Stop at collision, Highlight faces and Sound. Stop at collision and Highlight faces are on to begin; Sound is off. Dragged part only checks just the part you drag, not parts that move because of its mates.
- Dynamic Clearance: tick it, choose the components, and the smallest distance between the dragged part and them shows while you drag. Tick Stop at and type a distance to make the part halt before it gets that close.
These choices stay until you change them, and they also apply to a plain drag with the window closed.
Move with the Triad
Right-click a component and choose Assembly tools, Move with Triad to show a triad on it. Drag its arrows, squares and rings. Right-click the center of the triad for Move to XYZ..., Move by Delta XYZ..., Align with Component Origin and Align with Assembly Origin. Right-click a ring for Rotate 90 and Rotate 180.
Tips and What to Expect
- You can also left-drag a floating part in the view without opening the window, right-drag to turn it, and Ctrl-drag to drop a copy.
- Ctrl+Z and Ctrl+Y undo and redo moves, turns, copies, inserts and deletes.
- A part moved by its mates follows them and snaps back if you push it where a mate forbids.
- Type distances with fractions such as 1/2 or 1 1/2 in.
Common Mistakes and Messages
- "Plate<1> is fixed. Right-click it and choose Float to move it." Fixed parts do not move (the first part placed is fixed). Right-click it, choose Assembly tools, Float, then move it.
- "The assembly is exploded. Collapse it to move components." Collapse the exploded view first.
- "Pick a component in the view or the Model tree first." The window needs a selected part.
- "Type a distance such as 1, 1/2 or 1 1/2 in." A box holds something that is not a distance, such as a letter. Type a plain number or a fraction.
- The drag stops early. Collision Detection with Stop at collision is on, or Dynamic Clearance has a Stop at distance.