Sweep
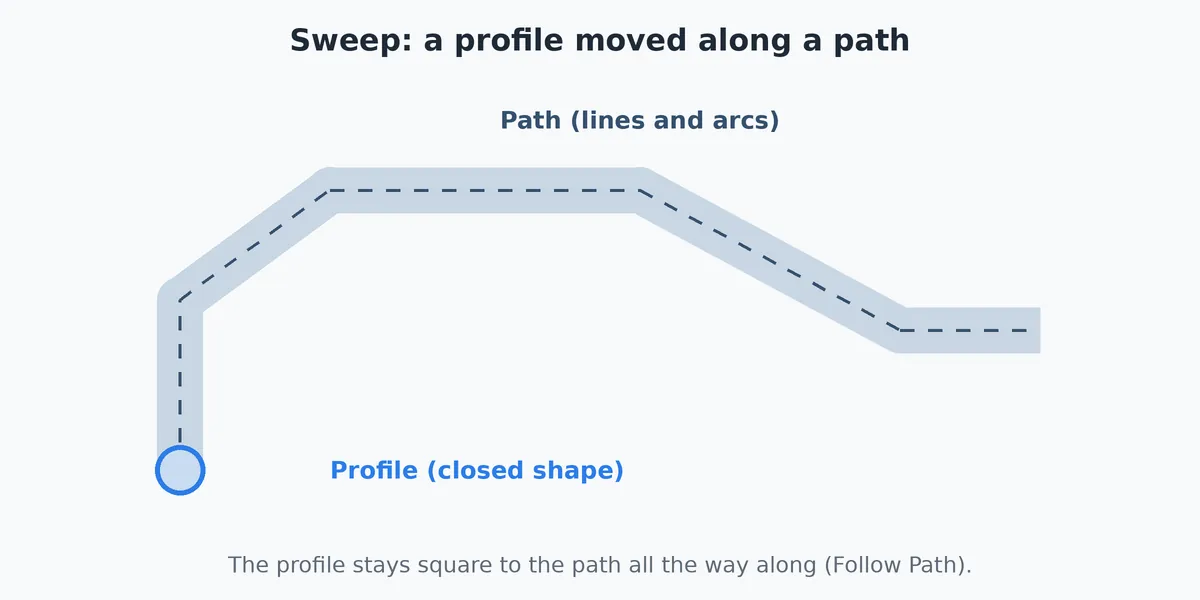
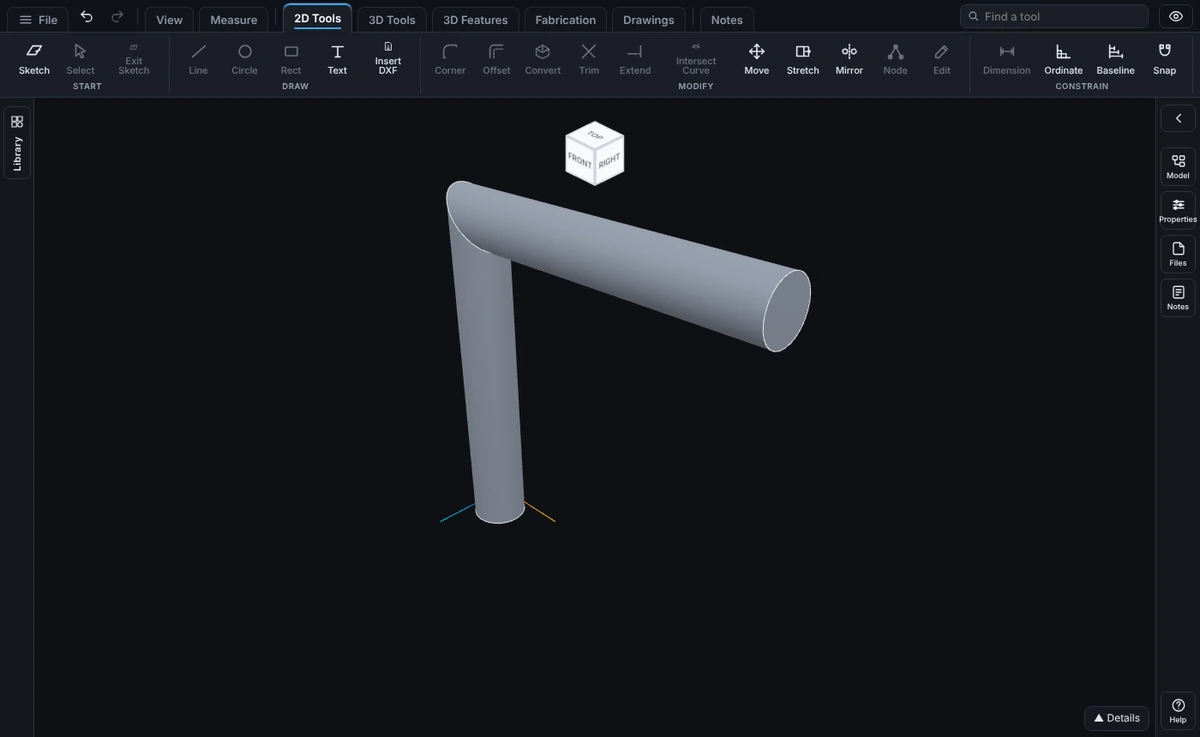
Sweep moves a profile along a path to make a solid. The profile is a closed shape in one sketch and the path is a run of lines, arcs and splines in another, or a run of edges of the part. You can also skip the profile sketch and sweep a plain round rod along the path, and with Thin Feature the sweep is a wall, like a tube, instead of a solid. The solid can be added to the part or cut out of it.
What you get: a solid (or a wall, with Thin Feature) made by moving the profile along the path, added to the part or cut out of it, with a message such as "Sweep applied." and the new volume.
When to Use It
- Make a pipe, rod, wire or handrail that follows a bent path
- Make a frame member from a profile and a path of lines and arcs
- Cut a groove, a channel or a slot that follows a curve
- Make a twisted bar or a spring-like shape by turning the profile as it travels
- Make a tapered handle, a horn, a bottle neck or a flared duct whose size changes along the way, by adding guide curves
- Make a hollow tube, a pipe or a duct with a wall of a set thickness, with Thin Feature
- Run a bead, a seal or a trim along the edges of the part, with Path: Model edges
Step by Step
- Open a sketch on a plane and draw the profile: a closed shape. Click Exit Sketch so the sketch waits in the Model tree without becoming a feature yet (see Exit Sketch).
- Open a second sketch on a plane that crosses the profile and draw the path: one run of lines and arcs that join end to end. Start the path on the profile's plane, or run it through that plane. Click Exit Sketch again.
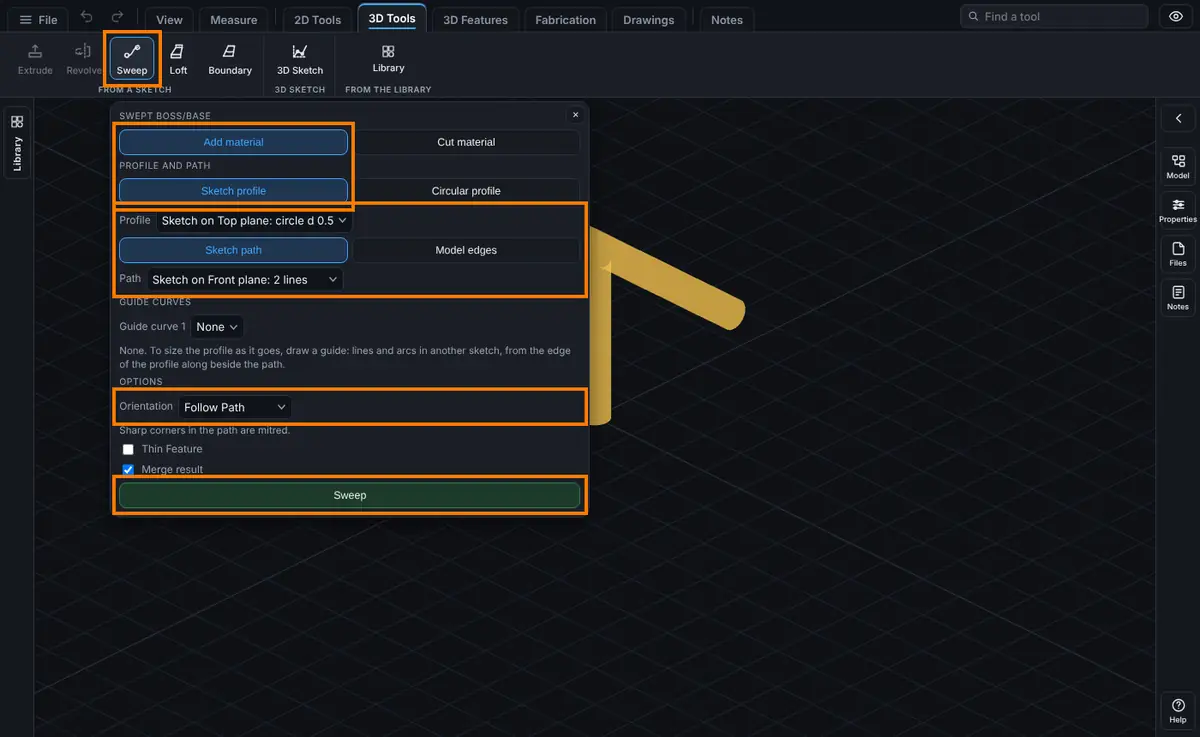
- Click Advanced on the Features tab, then Sweep.
- Choose Add material or Cut material.
- Choose Sketch profile and pick the Profile and the Path from the two lists, or click a waiting sketch in the Model tree to take it into the panel. For a plain round rod choose Circular profile, pick only the Path, and type the Diameter. To follow edges of the part instead of a path sketch, choose Model edges and click the edges in the view (see A Spline or Model Edges as the Path below).
- To make the profile change size as it goes, pick a Guide curve (see Guide Curves for a Sweep below). Otherwise leave it at None.
- Under Orientation leave Follow Path, or choose Twist Along Path and type the Twist.
- For a wall instead of a solid, tick Thin Feature, choose the Wall and type the Thickness (see Thin Feature for a Sweep below).
- For Add material, leave Merge result ticked to join the body it touches, or untick it for a separate body.
- Watch the preview. A yellow shape shows what an added sweep will make, and a red one shows a cut. Click Sweep (or Swept Cut).
Options
- Add material or Cut material: the panel heading reads Swept Boss/Base or Swept Cut.
- Sketch profile: your own closed shape. It has to be in a sketch of its own, not the path's sketch.
- Circular profile: no profile sketch. A circle of the Diameter you type is centred on the start of the path. It starts at 1/4 in (6 mm in a metric display). Type any unit to override.
- Sketch path or Model edges: where the path comes from. Sketch path takes a run of lines, arcs and splines from the Path list. Model edges takes edges of the part that you click in the view.
- Profile and Path: lists of the finished sketches, each named for its plane and what it holds, such as Sketch on Top plane: 2 in circle.
- Orientation: Follow Path keeps the profile square to the path all the way along. Sharp corners in the path are mitred. Twist Along Path also turns the profile about the path, evenly from start to end.
- Twist: how far the profile turns from the start of the path to the end, in degrees, radians or turns. Negative turns the other way. Twist needs one smooth run of lines and arcs that meet tangent, starting on the profile's plane.
- Guide curve 1 and Guide curve 2: up to two more sketches of lines and arcs that steer the size of the profile. None sweeps without them. See Guide Curves for a Sweep below.
- Follow guides (only with a guide picked): with one guide, Scale or Scale and twist; with two, Stretch or Scale.
- Thin Feature: makes the sweep a wall of the thickness you type instead of a solid. Wall says where the wall sits: Inward (inside the profile outline), Outward (outside it), Mid-plane (half each side) or Two directions (a thickness for each side, Inward and Outward). It starts at 1 mm (1/16 in in an inch display).
- Merge result (Add material only): joined to the body it touches, or kept separate.
- Bodies to cut (Cut material only, parts with more than one body): see Extrude and Cut.
Guide Curves for a Sweep
A guide curve is a run of lines and arcs in a sketch of its own. It starts on the edge of the profile and runs beside the path the whole way. As the profile travels, it changes so that its edge stays on the guide. Use it for shapes that get bigger or smaller along the way.
- Draw the profile and the path as usual, each in its own sketch, and click Exit Sketch after each.
- Open a third sketch on a plane that holds the path (often the same plane the path is on, as a separate sketch). Draw the guide from a point on the edge of the profile to the far end, beside the path. Click Exit Sketch.
- In the Sweep panel, pick it under Guide curve 1. A second list appears for an optional Guide curve 2.
- Choose how the profile follows under Follow guides, and watch the preview. Choosing None on a list takes only that guide away; the other one stays.
How the profile follows:
- Scale (one guide): the profile grows or shrinks evenly about the path. When the guide is twice as far from the path, the profile is twice as big.
- Scale and twist (one guide): the same, and the profile also turns about the path so it keeps facing the guide. A guide that winds round the path makes a twisted shape.
- Stretch (two guides): the profile stretches along the line between the two guides so it always spans them. Across that line it keeps its size. The profile also turns and moves with the guides.
- Scale (two guides): the profile grows or shrinks evenly so it spans the two guides.
What a sweep with guides needs and does:
- The path must be one smooth open run: lines and arcs that meet tangent, starting on the profile's plane. A closed path or a sharp corner is refused.
- Each guide must start on the edge of the profile (on a side or a corner, within 0.01 mm) and keep beside the path to the end. A guide that stops short is refused, with how far along it ran out.
- A guide may not touch the path, and the profile may not grow or shrink more than 100 times.
- Twist Along Path is off while a guide is picked; use Scale and twist to turn the profile.
- The shape is built from the profile placed at many stations along the path and blended smoothly, so between stations it follows the guide closely but not perfectly on a guide that bends sharply. With Scale and straight guides the size is exact.
- With Stretch, round edges of the profile (circles and arcs) are drawn as close smooth curves, so the volume of a round profile can be off by about 1 percent. Scale keeps them exact.
- Cut List does not count a sweep with guide curves as a member, since its size changes along its length.
- At most two guide curves. The profile is placed at about 64 stations spread along the path, plus more round each bend; a path that bends more than about 12 full turns in all is refused. A profile with very many sides on a long, bendy path is refused before any work starts, and a step that takes more than 60 seconds to work out is stopped and nothing is changed.
Thin Feature for a Sweep
Thin Feature turns the profile outline into a wall and sweeps the wall, so the result is hollow, like a tube. It works with a sketched profile and with Circular profile, which then makes a pipe of that outside size (with Inward).
- Set up the sweep as usual.
- Under Options, tick Thin Feature.
- Pick the Wall: Inward, Outward, Mid-plane or Two directions.
- Type the Thickness. For Two directions, type the Inward and the Outward thickness.
- Watch the preview, then click Sweep or Swept Cut.
What to expect:
- A 10 mm square swept 10 mm with a 1 mm wall Inward is 10 x 10 less 8 x 8, times 10: 360 mm3. Outward is 12 x 12 less 10 x 10, times 10: 440 mm3.
- Corners outside the outline stay sharp, as Extrude's Thin Feature makes them.
- An Outward wall needs room in a bend of the path too: the profile and the wall together must fit inside the bend.
- Not yet: a profile with a hole in it, an open line as the profile, Twist Along Path and guide curves. Each is refused in words; untick Thin Feature or change the other setting.
- Along a spline or a curved model edge, each curve may have at most 100 points and the path 400 points in all. A Thin Feature that takes more than 20 seconds is stopped and the part left as it was.
- Thin Feature along a path that is a closed loop with a curve in it (for example a closed Spline) is not made yet; the step is refused in words. Use a path of lines and arcs, or untick Thin Feature.
- Along a curve with more than 100 points in all there is no live preview; the line under the lists says so, and Sweep still makes it.
- After the sweep is made, Thin Feature is unticked and the path is back to Sketch path, so the next sweep starts plain. The thicknesses you typed are kept.
- Cut List does not count a thin sweep as a member.
A Spline or Model Edges as the Path
A Spline in the path sketch. Draw a Spline in the path sketch, on its own or joined end to end with lines and arcs. The sweep follows the smooth curve itself, not short straight steps. A closed spline on its own makes a closed path.
Model edges. The path can be a run of edges of the part:
- Click Sweep and choose Model edges under Profile and Path. The edges of the part are read, which can take a moment on a large part.
- Click Exit Sketch first if a sketch is open: edges are picked outside a sketch.
- Click the edges, one after the other. Each picked edge turns orange; click it again to drop it, or click Clear to start over. An edge under the pointer lights up before you click.
- The edges are joined end to end into one path, and the line under the path says so. The path starts at a free end of the run.
- Pick a profile (or Circular profile) that meets the start of the path, then click Sweep or Swept Cut.
What to expect:
- Straight edges become lines, round edges become arcs (a whole circle edge becomes a closed path), and other curved edges become smooth curves.
- The path is a copy of the edges as they were when you picked them. If an earlier step later changes those edges, the sweep keeps its own path. To follow the new edges, sweep again.
- At most 64 edges in one path. Edges that branch (three at one corner), leave a gap, or include a closed loop together with other edges are refused in words.
- A spline or a curved model edge sweeps with Follow Path only: Twist Along Path and guide curves need a path of lines and arcs. A curve piece takes at most 400 points, and a path at most 500 pieces.
- A sketch with a spline in it is not offered as a guide curve, in Sweep or in Loft: a guide is still a run of lines and arcs.
- Cut List does not count a sweep along a spline or a curved model edge as a member.
A 3D sketch. The path can also be a 3D Sketch: straight lines through points anywhere in space, not on one plane. It is listed under Path with the sketches. When the 3D sketch is changed later, the sweep follows it.
Edit It Later
Right-click the step in the Model tree and choose Edit Feature. You can change the circular Diameter, the Orientation and Twist, Follow guides, the Thin wall (where it sits and how thick) and Merge result. To change the profile, the path or a guide curve, right-click its sketch under the step and choose Edit Sketch. To remove a guide curve, click its × under Guide curves in Edit Feature; to add one, delete the step and sweep again. A path of model edges has no sketch under the step; to follow other edges, sweep again. The profile, path and guide sketches are used up when the step is made. Undo brings them back.
Tips and What to Expect
- A round profile looks the same however it turns, so Twist has no visible effect on a circular profile.
- A sweep along a path that bends needs the profile to fit the bend. A 1 in wide profile cannot go round a bend only 1/2 in round.
- A sweep of a long rectangle profile along a straight path is how a bar of any length is made. Cut List counts each straight piece of a swept path as a member.
- The preview updates a moment after each change. If it cannot be made, the line under the lists says why.
Common Mistakes and Messages
- "A sweep needs a path" or "Pick a path": finish a path sketch with Exit Sketch and pick it in the Path list.
- "The profile and the path must be in different sketches." Draw the path in its own sketch on a plane that crosses the profile.
- "The path does not reach the plane of the profile. Start the path on that plane, or run it through it." Redraw the path so it meets the plane the profile is on.
- "The path starts along the plane of the profile, so the profile would sweep flat." Draw the path on a plane that crosses the profile.
- "The path is broken: piece 3 does not start where piece 2 ends." A path must be one run of joined lines and arcs. Snap each end to the next.
- "The profile is too big for a bend in the path: it reaches ..." Make the bend wider or the profile smaller.
- "Twist Along Path needs a smooth path: piece 1 and piece 2 meet at a sharp corner." Join them with an arc, or use Follow Path.
- "Type a twist angle other than 0, like 90 deg or 1 turn, or choose Follow Path."
- "Guide curve 1 does not cross the plane of the profile." Start the guide on the edge of the profile, on the profile's plane.
- "Guide curve 1 does not start on the edge of the profile: it starts 8.500 mm away from it." Snap the start of the guide onto a side or a corner of the profile.
- "This sweep with guide curves would take too long: ..." Use a profile with fewer sides, or a path with fewer bends.
- "Guide curve 1 does not reach the profile 80 percent of the way along the path." Make the guide run beside the path all the way to its end.
- "Guide curve 1 comes too close to the path ... percent of the way along, so the profile would shrink to nothing." Keep the guide away from the path, so the profile never shrinks to nothing.
- "A sweep with guide curves needs a smooth path." Join sharp corners in the path with an arc, or sweep without guides.
- "Guide curve 1 must be an open run of lines and arcs, not a closed shape." Draw the guide as an open line or arc run.
- "Type a wall thickness more than 0 for Thin Feature." Type a thickness, or untick Thin Feature.
- "The wall is thicker than a short side allows. Use a thinner wall." An Inward wall must fit inside the profile.
- "Thin Feature works on one outline at a time, and this profile has a hole in it." Use a profile with no holes, or untick Thin Feature.
- "Thin Feature does not work with Twist Along Path yet." Choose Follow Path, or untick Thin Feature.
- "The picked edges do not join end to end: there is a gap after edge ..." Pick edges that meet, in one run, with no gap.
- "The picked edges branch: three of them meet at one corner." Drop one of the edges at that corner.
- "Exit Sketch first, then click the edges of the part for the path." Close the open sketch with Exit Sketch.
- "Twist Along Path needs a path of lines and arcs." A spline or a model edge path sweeps with Follow Path only.
- "The sweep with guide curves could not make a solid." The profile may fold over itself where a guide turns sharply. Smooth the guide, or make the profile smaller.