Insert Components
Puts saved models into the assembly, as many copies as you like. It is the first thing you do in a new assembly. Assemblies need the Pro plan.
What you get: the model placed in the assembly as a component named like Plate<1>, listed in the Model tree, fixed if it is the first one and floating after that, with a message such as "Placed Plate<1> (fixed)."
When to Use It
- Start an assembly with its first part
- Add more parts or more copies of a part
- Place a part straight onto another with a SmartMate
Step by Step
- Open an assembly (File, New, Assembly, or File, New, Assembly from This Model).
- Click Insert on the Assembly tab (Components group), or + Insert on the assembly row of the Model tree. You can also right-click the assembly row and choose Insert Components.... The Insert Components window opens.
- Pick a model from Open models or from My models (type in the search box to narrow it). Ctrl-click to pick several. The line at the bottom of the window says the model is ready.
- Click in the view where you want the part. With Graphics preview ticked the part follows your pointer before you click.
- For the first part you can instead click Place at origin, click the origin marker in the view, or double-click, to put the part's origin on the assembly origin.
- The window closes after each placement. To place several copies in a row, click the pin at the top of the window first; each click then places another copy, and Done (or the X, or Esc) finishes.
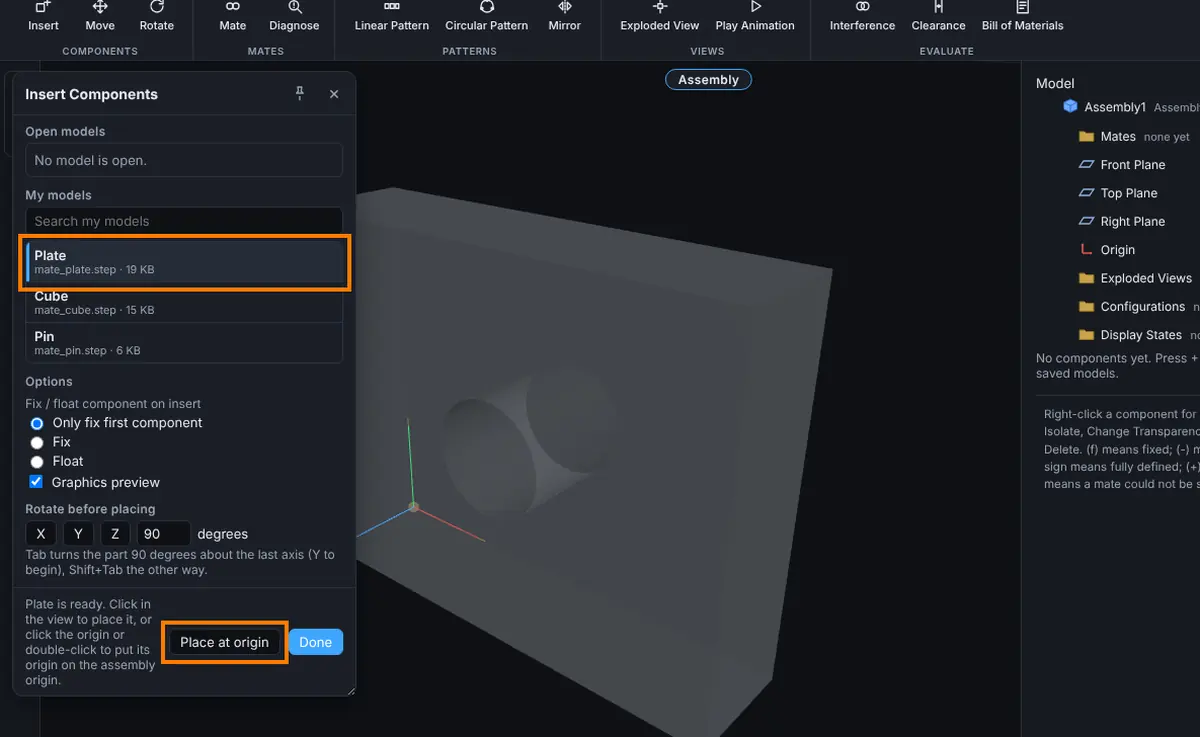
Options
- Fix / float component on insert: Only fix first component (the default), Fix or Float. A fixed part cannot be moved. A floating part is held only by mates.
- Graphics preview: shows the part following the pointer.
- Rotate before placing: the X, Y and Z buttons turn the waiting part by the number in the degrees box (90 to begin). Shift-click a button to turn the other way. While placing, Tab turns it 90 degrees about the last axis used (Y to begin) and Shift+Tab turns it back.
- Pin: keeps the window open between placements.
- Place at origin: drops the part on the assembly origin.
- Alt while the part follows the pointer: places it with a SmartMate onto the face, edge or corner under the pointer. Letting go of Alt or pressing Esc takes the temporary part away.
Tips and What to Expect
- Each placed part gets an instance name such as Bracket<1>, Bracket<2>. The numbers are never reused.
- An assembly can hold up to 500 components (counting everything inside its subassemblies).
- You can insert another saved assembly as a subassembly. It shows an assembly icon in the lists. See Subassemblies and Patterns.
- Insert as floating if you plan to mate the part into place. Fix the first part so the rest has something to hold on to.
Common Mistakes and Messages
- "Assemblies are on the Pro plan." Making or changing an assembly needs the Pro plan or higher.
- "No model is open." This shows under Open models when no other model is open in a tab. Nothing is wrong: pick the model under My models instead.
- "Plate<1> is fixed. Right-click it and choose Float to move it." The part was inserted fixed (the first one always is, unless you chose Float). Right-click it and choose Assembly tools, Float before you move it.
- The window closed after one part. That is how it works unless the pin at its top is on. Click Insert again, or turn the pin on to place copies one after another.