Flip side to cut
An option for Cut only. A normal Cut removes the material inside the profile. Flip side to cut removes the material outside it, and keeps what is inside. For a guided example with pictures, see the Flip side to cut Walkthrough.
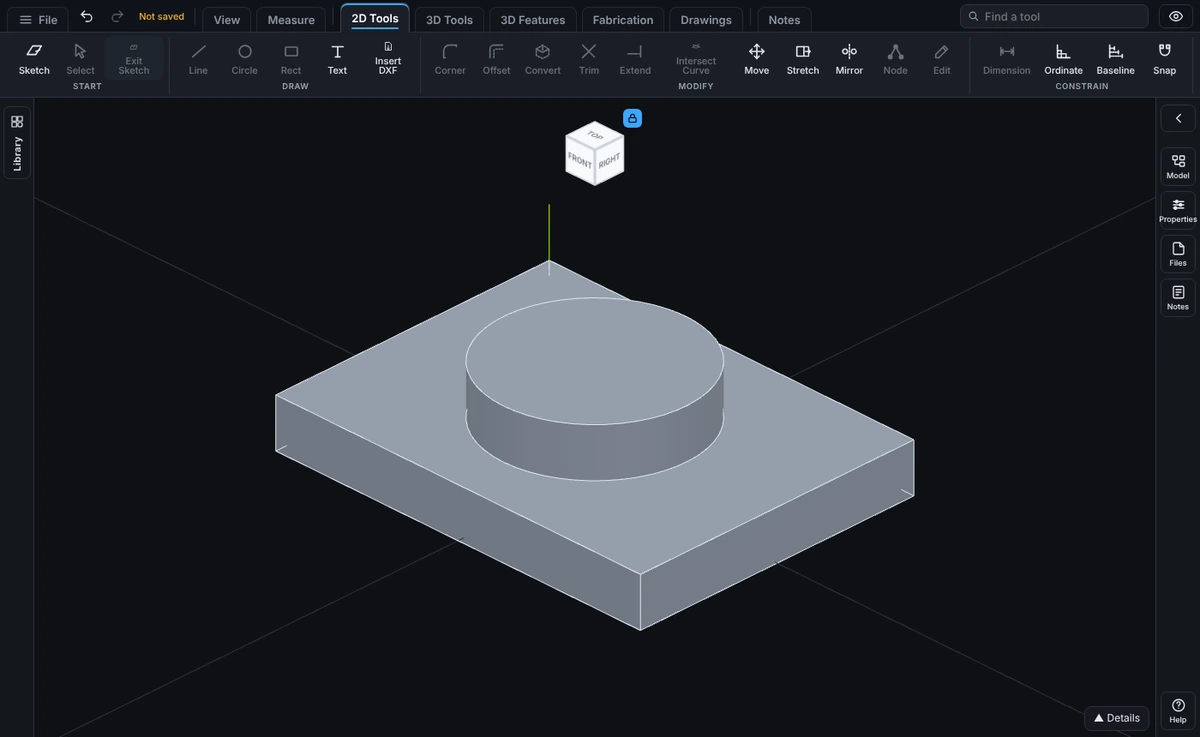
What you get: the material outside your outline cut away to the depth you set, and what is inside it left standing, with the message "Cut applied. Volume is now 7.571 in³." (for the example below).
When to Use It
- Trim a block down to a shape drawn on its face
- Cut a round boss out of a square bar by drawing the circle
- Keep the part of a body that sits inside an outline, and remove the rest
- Shape a blank to an outline without drawing the outside as well
How It Works
The cut uses the area outside your profile, in the range of the cut. The depth, the Direction and the Bodies to cut choice all work as usual, so only the bodies the cut is set to work on lose material. A profile with a hole in it keeps the inside material and also keeps the island of the hole.
Step by Step
- Open a sketch on the face of the part and draw a closed profile that sits over it, for example a circle (see Planes and Faces). Sketching is part of modeling, which comes with the Pro plans.
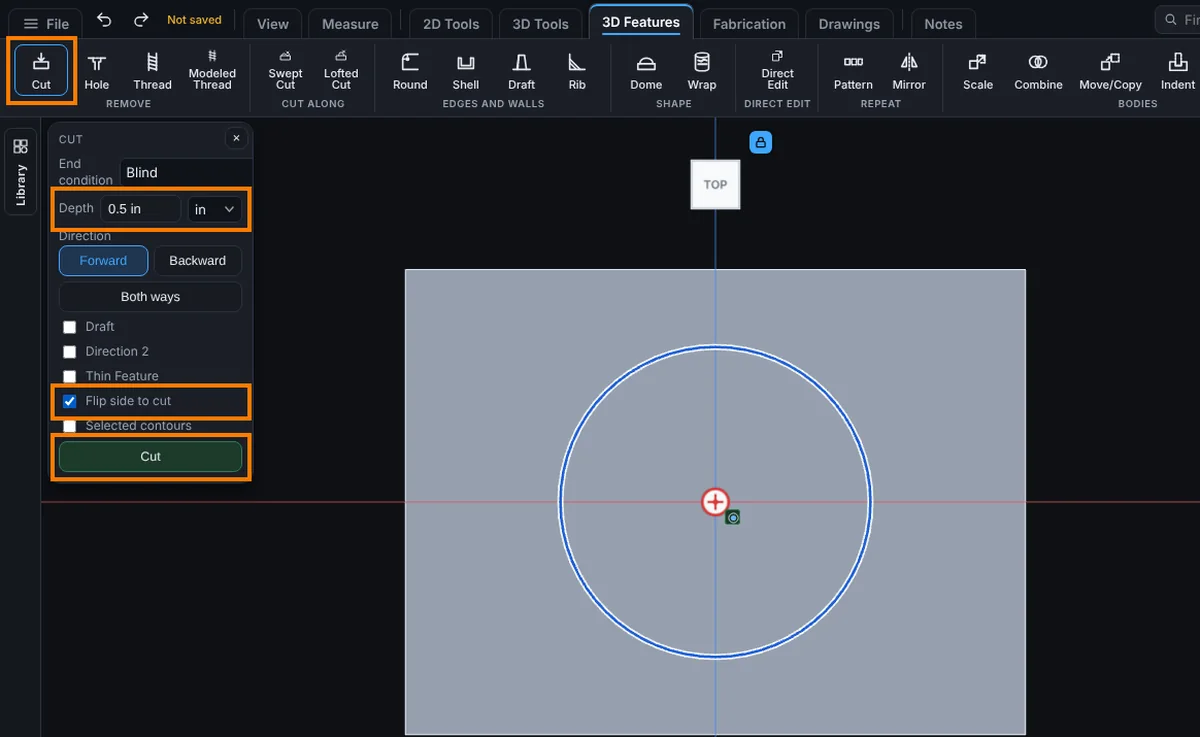
- On the Features tab, click Cut.
- Set the Depth to cover the part, for example
1 in, or choose Through All. - Tick Flip side to cut.
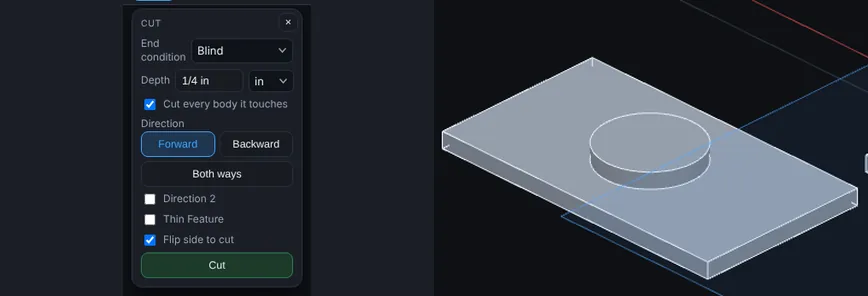
- Click Cut. Everything outside the profile, in that depth, is removed.
- The Model tree names the step, for example Cut circle d 2 in, 1 in, outside removed.
Options
- Flip side to cut (tick box): cut outside the profile instead of inside. It is on the Cut panel only.
- Depth, Direction and End condition: set how far the cut goes, as for any cut.
- Bodies to cut: choose the bodies that lose material.
Edit It Later
Right-click the step in the Model tree and choose Edit Feature. The Flip side to cut tick box is there. Press Esc or the X to close without changing anything.
Tips and What to Expect
- Flip side to cut cannot be used with Thin Feature. Ticking one unticks the other. If both reach the tool, it says: Flip side to cut cannot be used with Thin Feature. Untick one of them.
- The profile has to be a closed outline. An open line is refused: Flip side to cut needs a closed outline.
- If the profile covers every body in the cut range, there is nothing outside it to remove, and the step is refused: The cut removed no material. The sketch may not overlap the part, or the depth may be too small.
- Up To Next works with Flip side to cut. The material outside the outline that starts at the sketch is cut, straight along the way the cut runs, and each line of it stops at the first face it leaves by. Anything further along that line, past open space, is left alone: a step below an overhang, or the far arm of a C shaped part, stays. Open space beside the part (a round part, or a notch) has nothing to cut and is left alone too.
- What Up To Next can follow under Flip side to cut: flat faces at any angle; round faces of holes and bosses (cylinders) at any angle, so the material under a hole drilled across the cut (straight across or on a slant) stays; cones whose axis runs exactly along the cut or exactly square to it; and any other curved face that faces the cut the same way all over, such as the round bottom of a ball end pocket drilled along the cut.
- What it refuses: any other curved face that turns from facing the cut to facing away from it, such as a ball shaped hollow, a ring shaped groove, a cone set on a slant, the round end of a blind hole drilled across the cut, or a free form face. The step is refused rather than cut wrongly: Flip side to cut with Up To Next cannot follow the curved face that crosses the cut here yet (a ball, a ring, a slanted cone or a free form face). Use Blind or Through All instead.
- The result is checked before it is kept: it must be a sound solid, with a volume more than zero and no larger than before. If it is not, the step is refused and the part stays as it was: Flip side to cut with Up To Next did not give a sound solid here, so the step was not applied and the part is as it was. Use Blind or Through All instead.
- With Up To Next the sketch has to be on the part, not floating above it. If no part starts at the sketch in that direction (the sketch is in the air, or on the side of the part that faces away from the cut), there is no face to cut up to, and the step is refused: Flip side to cut with Up To Next: no part starts at the sketch in this direction, so there is no face to cut up to. Sketch on the part, choose Backward, use a depth or Through All, or pick a face with Up To Surface. It is never turned into Through All.
- A Pattern can repeat a Flip side to cut step. Every copy removes what is outside its own outline, so the copies together keep only what lies inside all of the outlines (and a cut that is only a few millimetres deep takes the whole layer when the outlines do not touch). If a through cut would leave nothing at all, the Pattern is refused: A pattern of a Flip side to cut step keeps only what lies inside every copy of the outline, and these copies do not overlap, so nothing would be left. Space the copies closer than the outline is wide.
- Flip side to cut works with Direction 2.
- An older version of the viewer (6.333.0 or earlier) cuts the inside of the profile instead. The shape is different, so check it there. The file is not damaged, and opening it again here brings the flip back.
Common Mistakes and Messages
- "Flip side to cut needs a closed outline." The profile is an open line. Close it into a shape.
- "Flip side to cut cannot be used with Thin Feature. Untick one of them." Untick Thin Feature to keep the flip.
- "The cut removed no material. The sketch may not overlap the part, or the depth may be too small." The outline covers the whole part, or the depth reaches nothing. Draw a smaller outline, or check the Direction.
- "Flip side to cut with Up To Next did not give a sound solid here, so the step was not applied and the part is as it was. Use Blind or Through All instead." Type a depth, or choose Through All.