Nest
Lays the flat parts of your model out on sheets of plate or sheet metal, so you know how many sheets to cut and how the parts sit on them. Use it for laser, plasma or waterjet jobs made from plates and flat patterns.
What you get: how many sheets to cut and how full they are, a small picture of every sheet, one DXF file for each sheet to send to the cutting table, and a placements file (which part, which sheet, where, and how it is turned) that any other program can read.
Step by Step
- Open the part or assembly and show the flat parts in the Model tree. A body that is hidden is not nested; a single part needs nothing here, and for an assembly tick the bodies you want in the Model tree on the left.
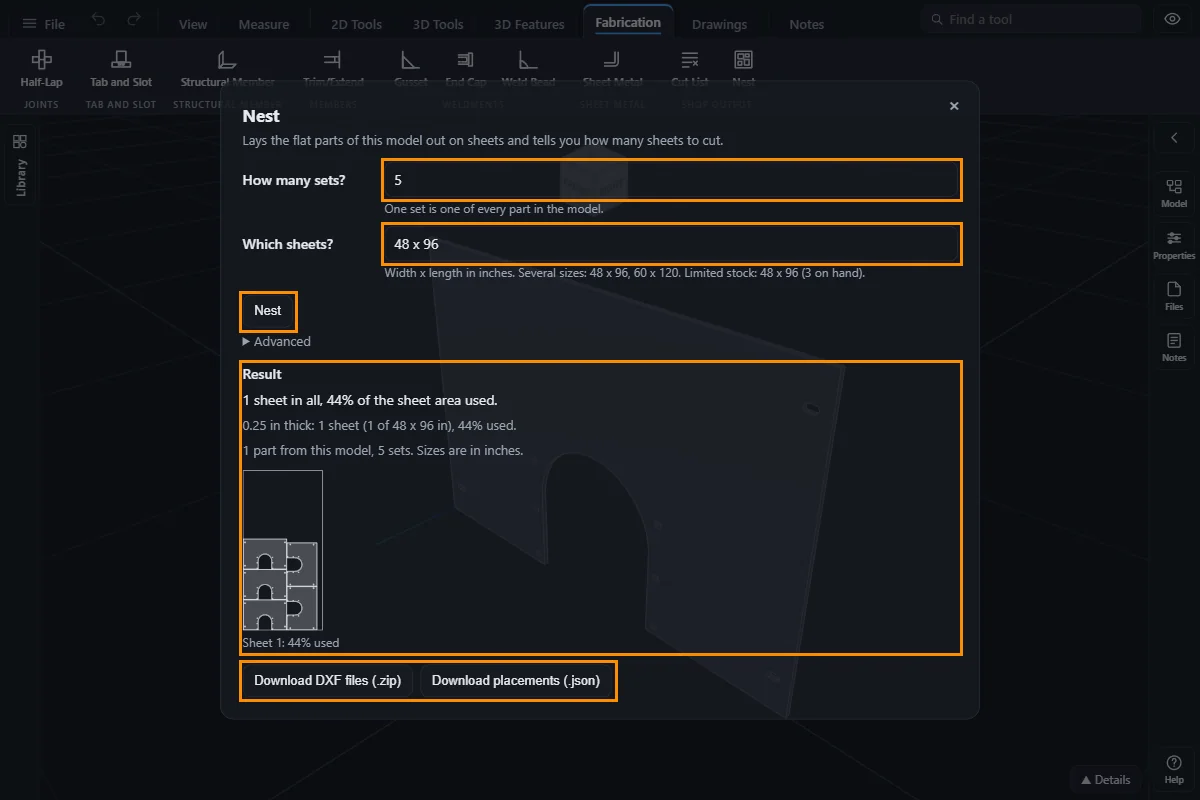
- Click Nest on the Fabrication tab, under Shop output. The Nest window opens.
- Under How many sets? type how many (the box starts at 1) of the whole model you need. One set is one of every part.
- Under Which sheets? type the sheet size as width x length, for example 48 x 96. The window's hint under the box names the unit (inches or millimetres); change it under Settings, Units. The box starts with 48 x 96 in. For more than one size separate them with commas: 48 x 96, 60 x 120. For a limited stock add the count: 48 x 96 (3 on hand).
- Press Nest. The page keeps working while it looks for a tight layout, about five seconds, then shows the result.
- Read the result: the number of sheets, the percent of the sheet area used, and a picture of each sheet. If something did not fit, a line says which part and why.
- Press Download DXF files (.zip) for one DXF per sheet plus the placements, or Download placements (.json) for the positions only. Download report (.csv) gives one row per sheet for a spreadsheet: parts, part area, percent used and scrap, cut length, pierces and the leftover pieces. Tick Offset for kerf and add lead-ins above the download buttons first if the sheet files should carry the kerf offset and lead-ins for a plasma or laser table (Advanced plan and up; off unless ticked). Notes about any part that could not take them show under the buttons.
- To price the sheets, open File > Quote... and press Add Nest sheets. Each sheet size becomes one line with its count, priced from the price list you pick.
- Press X or Esc to close the window. The result stays until you nest again.
What Gets Nested
- A plate. A flat body whose biggest face, pushed through the thickness, fills the body: a laser cut plate, a flat bar, a gusset. Its outline and every hole are laid out, and its thickness keeps parts of different thickness on different sheets. A plate with a small lug or boss on it (a plate with a tab welded on) is nested as the plate alone, and a line under the result says the lug is not in the outline.
- Bent sheet metal. When the flat pattern of the part can be made, the flat pattern is nested. If it cannot, the part is listed under Left out with the reason.
- Not nested. A tray whose flat pattern cannot be made, a block, a tube or any solid that is not flat is listed under Left out with the reason, for example "it is not sheet metal: it has no bends and is too thick or too uneven to be a flat plate": nothing is guessed. Use the Cut List for tubes and bars.
The Settings
- How many sets? The whole model, this many times.
- Cut order for the sheet (on by default): the sheet files are written with every mark first, then the holes of every part, then the outlines. Parts are taken nearest first from the sheet corner, and where another part is near, an outline is not cut right after the part next to it, so the torch travels less and the heat spreads (a nest packed tight cannot always avoid neighbours, and the heat step costs some travel). Switch it off to get the file part by part in the order the parts were placed.
- Torch moves go around parts already cut free (on by default, with the cut order): the next outline is picked so the torch does not travel over a part that is already cut free, which can tip up into it. Only the order changes. Where a move cannot avoid one, a note says how many. Micro-tabs (below) hold a part so it no longer counts.
- Micro-tabs on small parts (off by default, Advanced plan and up): each small outline keeps a short bridge of uncut metal, so the part cannot tip up when the cut frees it. Tab width is the metal left (0.03 in or 0.762 mm to start); the cut line is opened by the kerf more. Parts up to is the longest side that gets tabs (4 in or 101.6 mm to start): one tab up to a quarter of that, two up to it, none for larger parts. Tabs sit on straight runs, away from corners and the pierce. Break or grind them off after the cut.
- Which sheets? Width x length of the stock. With no count the nest uses as many sheets as it needs. With a count in brackets it stops at that many and says what did not fit.
- Advanced: Space between (the gap kept between parts, 0.125 in or 3.175 mm if left empty), Edge margin (the empty border of each sheet, 0.25 in or 6.35 mm), Keep grain direction (parts may flip but never turn sideways), Common line (after the nest the parts are slid together until they touch, and an edge two parts share is cut once; the report and the DXF show the saving; the gap between parts is then zero, so use it only when the cutter's kerf may be shared, and not with Quick layout), Quick layout (rectangles only: instant, but it uses more sheets) and Time to try (more seconds can save a sheet; your plan sets the most).
- Stop ends the search early and gives the quick layout.
The Report and the Leftovers
Under the result a line says how much of the sheet area is part and how much is scrap, the length to cut and the number of pierces (every outline and every hole is one pierce). It also names the leftover pieces: the biggest free rectangles on each sheet, at least 6 x 6 in (150 mm), up to three per sheet, rounded down to a quarter inch (5 mm) and never touching a part or the edge margin. Press Add leftovers to Which sheets to write their sizes into the sheets box, then nest again to use them as stock. The CSV lists the same numbers, with a total for each material and thickness.
Stock, Leftovers and Cost
Tell Nest what you have and what it costs, and it picks the cheapest mix. In Which sheets? write a price after a size, 48 x 96 $180, and a leftover on hand with the word remnant, 24 x 36 remnant (2 on hand) or 12 x 20 remnant $4. A leftover with no price costs nothing, because you already paid for it. A sheet with no price of its own can be priced by Price per sq ft under Advanced (square metre when the unit is millimetres). Tick Cut-down pieces to let a small job use a quarter, half or three quarters of the length of a sheet, priced at its share of the sheet plus 15 percent.
Nest first nests on all the stock, then tries to put the parts of a sheet on a cheaper piece of stock, and the parts of two sheets on one piece that costs less than both. Every answer is checked like any other nest. The result says what the stock costs and what whole sheets alone would have cost, the report and the CSV show what each sheet is (whole sheet, leftover or cut-down piece) and its cost, and Add Nest sheets in the Quote window leaves out the leftovers you already have. With no prices at all Nest still chooses the smallest stock that does the job.
My Stock
Keep the sheets and leftovers you have on hand in My stock, a button in the Nest window. Each row is one size: sheet or leftover, width, length, thickness and material (empty means any), how many are on hand and the price of one piece. A Stick leftover row is for the saw nest: its length, the profile in Material or profile (for example 2 x 2 x 0.1875, needed) and how many are on hand; it has no width or thickness and the sheet nest never uses it. When you are signed in the list is kept with your account, so every device and your AI connection see the same list; signed out it is kept in this browser only. Tick Use my stock and Nest cuts from the list instead of the Which sheets box, and picks the cheapest mix as above.
When the nest is done, Take out of my stock, keep leftovers removes the sheets it cut (one piece for each sheet) and adds the leftover pieces to the list, once for each nest. Undo brings the old list back. An AI connection reads and changes the list the same way (fab.stock_get, fab.stock_set, fab.stock_adjust and fab.stock_take_nest), and every change is checked as it is in the window: nothing goes below zero, and one wrong row stops the whole change.
If you keep purchase orders here, type the order number in the My stock window (PO-00012 is 12) and press Add received sheets. The sheets of that order that are marked received go onto the list at the price on the order, each piece only once, however often you press it; a line is read when its unit is sheet and its description has a size such as A36 1/4 x 48 x 96 (a size with no unit, like 4 x 8, means feet). Lines that cannot be read are listed, so you can add them by hand. An AI connection does the same with fab.stock_from_po.
Saw Nest: Tube, Pipe and Bar
The saw-cut counterpart of Nest. It cuts the tube, pipe, bar and structural members of the Cut List from stock lengths, and tells you which sticks to pull, where to saw each piece, and what is left over. Open it with Saw nest... in the Cut List window or in the Nest window.
- Build the frame first, so the Cut List has members (see Cut List).
- Open Saw nest... from the Cut List or the Nest window.
- Under Which sticks? type the stock lengths, for example 20 ft, 24 ft. A price goes after a length (24 ft $90, or 20 ft $3.50/ft), a leftover says remnant (6 ft remnant (2 on hand)), and a limited stock says how many are on hand (24 ft (3 on hand)). To give one profile its own sticks put its size first: 1 x 1 = 20 ft. A new line starts another profile. Empty means one 20 ft stick (6 m when the unit is millimetres) for every profile. Tick Use my stock to cut from the stick leftovers in My stock first (add a row of kind Stick leftover in My stock, with its length and the profile in Material or profile, for example 2 x 2 x 0.1875; a leftover goes to the first profile whose name holds that text).
- Press Saw nest. The page shows how many sticks, how much of the stock is part, the total drop and the cost, then a picture of every stick with its pieces in saw order, and the drops that are long enough to keep.
- Press Print / PDF for the saw cut sheet (the sticks to pull, then every cut in order with its length, both angles and which way each end slants, and where it starts and ends on the stick), Excel for the same in a spreadsheet, or Download CSV.
- Press Add drops to the sticks box to rewrite the box: the leftovers this nest cut from come off the count, and the drops worth keeping go in, so the next saw nest uses them first.
- With Use my stock ticked, press Take out of my stock after the nest: each stock leftover it cut from comes out of My stock (once for each time it was cut from) and the drops worth keeping go in as stick leftovers. Undo puts the stock back. A nest can be taken out once.
How it counts. A piece takes its longest edge along the stick, as the Cut List gives it. A square cut costs one saw kerf (the drop is measured to the last piece, before the cut that frees it). A mitre costs the kerf across its slant. Two pieces whose touching ends have the same mitre angle share one cut and nest into each other (the next piece is turned over to match), which saves the slant, so a frame of mitred pieces needs less stock than the same pieces cut square. A mitred bar is a trapezoid when its two cuts slant opposite ways (pieces turn over in turn as they nest) or a parallelogram when they slant the same way (they lie alike, and each reaches past its length by the slant). Pieces with cuts across two faces never nest, and neither do mitred angle, channel or tee pieces that would have to be turned over (they are cut one by one). The Ends column of the cut sheet and the pictures show which way each end slants, seen from the first face, so you can roll each piece to match. Leftovers are used first, and with prices the cheapest mix of sticks is picked. Advanced sets the Saw kerf (0.125 in or 3.175 mm if empty), the End trim taken off each end of every stick (0 if empty) and Keep drops of (the shortest drop listed as worth keeping, 12 in or 300 mm if empty).
What is sawn. The bars of the Cut List. Arcs (bends) are rolled or bent, not sawn, and are listed under Left out. The width across a mitre comes from the lengths in the Cut List; when they do not say, it is the smaller side of a tube or profile, or the diameter of round stock. A piece longer than every stick is listed as not placed.
Your plan and AI. The saw nest is on the paid plans and counts as one nest of the plan's monthly allowance, with its pieces counted as part copies. An AI connection runs it with fab.saw_nest and gets the sheet with fab.saw_export (csv, pdf or xlsx). fab.saw_nest takes use_stock, and fab.saw_stock_take does the take-out.
The Files
- The DXF of a sheet holds the sheet border, the empty edge margin, every part outline, its holes and its name, each on its own layer (SHEET, MARGIN, PARTS, HOLES, LABELS). The unit is written into the file, so another CAM program reads inches as inches and millimetres as millimetres.
- The placements file lists, for each sheet, each part, its x and y, and its turn in degrees. The file also says how to turn those numbers into positions, so a program that has never seen STEPFILE.com can rebuild the nest.
Your Plan
Nest is on the paid plans. Each plan has a number of nests a month, the most part copies in one nest and the longest time to try. A nest counts when it starts. A nest that is refused for the plan or the size is never counted.
Common Mistakes and Messages
- "Nest is on the paid plans. See the plans to add it." Your plan does not have Nest. Follow the link to the plans.
- "There is no solid yet, so there is nothing to nest. Extrude something first." The part has no solid body yet.
- "Say which sheets to cut from, for example 48 x 96." The sheet box is empty. Type width x length.
- "The nest has nothing to add. Run Nest first, then add its sheets." You pressed Add Nest sheets in the Quote window before nesting. Close the Quote window, run Nest, and open the quote again.
- "Your stock list has nothing on hand." Use my stock is ticked but every row in My stock has none left. Add sheets in My stock, or untick Use my stock.
- A sheet size is refused. Write it as two numbers with an x between them: 48 x 96. Use the same unit as Settings.
- Everything is under Left out. The bodies shown are not flat plates. Show the plates, or make the flat pattern of a bent part first.
- A part says it is not sheet metal. It is a solid block or a thick machined part with no bends. Nest only lays out plates and bent sheet metal; use the Cut List for blocks.
- A line says a lug or boss is not in the outline. The part is a plate with something standing on it. Only the plate is laid out; check that the shop cuts the lug separately.
- No leftover is listed. No free rectangle is 6 x 6 in (150 mm) or bigger after the edge margin, or the sheets are full.
- Common line saved nothing. The parts are round or far apart, so no straight edges meet. The report line says how much edge is shared.
- Parts did not fit. A part is bigger than the sheet or its margin. Pick a bigger sheet or lower the edge margin.
- More sheets than the shop would use. Give it more time under Advanced, or turn off Keep grain direction if the stock has no grain.
Bent Parts
The flat pattern of a bent part is nested like any other part. Its bend lines go on the sheet DXF on their own layer, BEND, and in the placements file as etch moves that are not cut. For the order to bend in see Bend Sheet.
Related
See Bend Sheet, Cut List, Sheet Metal and Export Faces as DXF.