Export This Part as STL
Saves the model, or one part of it, as an STL mesh for 3D printing or other programs.
What you get: one .stl file named after the model (with -inch added when you choose inches), and a message giving the number of triangles, the file size, the file type and the units.
Step by Step: The Whole Model (File, Export, STL)
- Open File, point to Export (or click it) and click STL.... The Export as STL window opens.
- Pick the File type: binary (the default, smaller) or ASCII (readable text, about four times larger).
- Pick the Units: millimeters or inches. STL files carry no units, so the number in the file is in the unit you choose; set the same unit in your slicer.
- Pick the Detail: Full detail writes the triangles as shown, Reduced and Draft merge points that are very close together for a smaller file.
- Or pick a Resolution to cut the part again, finer or coarser than it looks on screen (see Resolution below).
- When the model has more than one body and the Resolution is As shown, tick the bodies to include. Shown bodies start ticked and hidden bodies are left out.
- Read the size line (about how many triangles and how large the file), then click Export.
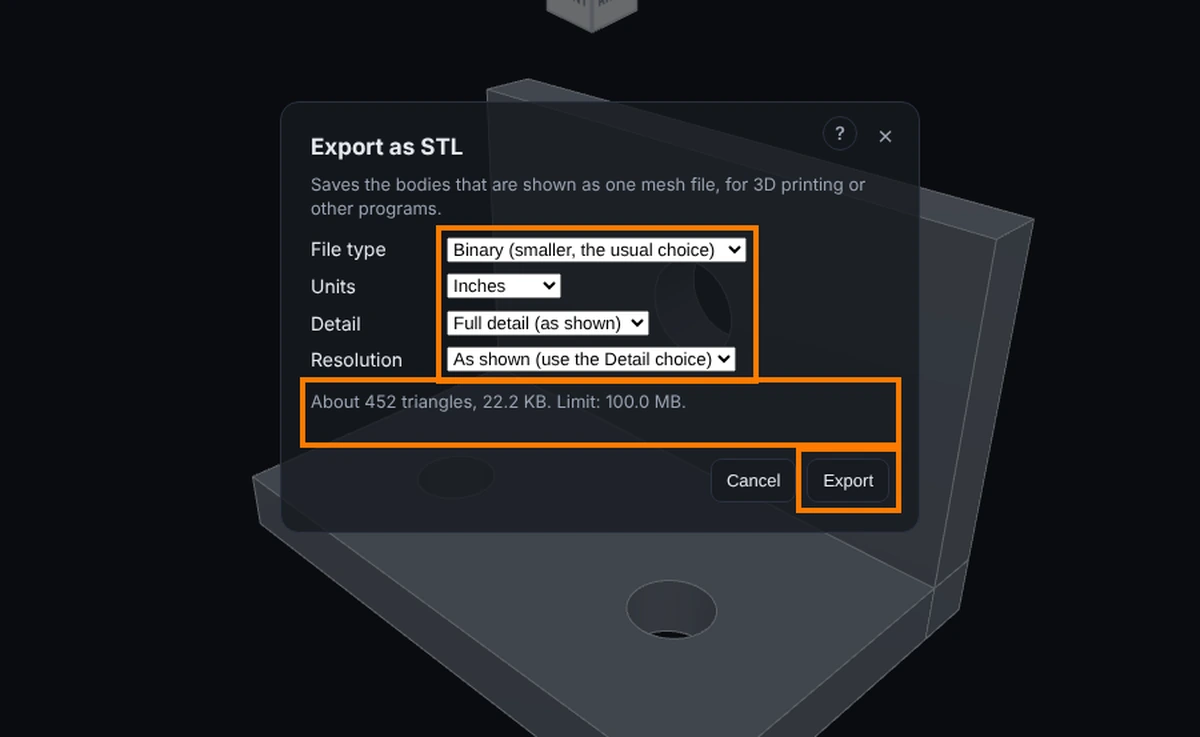
The file is named after the model, ending in .stl (with -inch added when you choose inches). A message gives the triangle count, the size, the file type and the units.
Resolution
The Resolution choice cuts the exact part into triangles again, so a curved part can be smoother or lighter than it looks on screen.
- As shown keeps the triangles on screen and uses the Detail choice above. This is the default.
- Coarse is a smaller file: a flat triangle may sit up to 1/250 of the part's size away from the true curve, and neighbouring triangles may turn up to 30 degrees.
- Fine is for smooth curves: 1/5000 of the part's size and 5 degrees.
- Custom lets you type both numbers. Deviation is the most a flat triangle may sit away from the true curved surface, in the unit you chose (millimeters or inches). Angle is the most two neighbouring triangles may turn from each other, in degrees.
The size line shows the real number of triangles and the file size for the choice, so you see them before you export. It also gives the deviation and angle used (for Coarse and Fine it works them out from the size of your part). A smaller deviation or angle means more triangles and a larger file; the volume of the written part stays within the deviation of the true part, and a little under it, because the flat triangles sit inside the curve.
Allowed values: a deviation from 1/50,000 to 1/10 of the part's size (the window gives the numbers in your unit) and an angle from 1 to 90 degrees. Anything else is refused in words, with the range.
Limits of Resolution
- It cuts the whole part. The list of bodies is hidden and hidden bodies are written too. Use As shown to leave bodies out.
- It works on a STEP part, or a part you are modeling here (with your edits, saved or not). A mesh file (STL, OBJ, 3MF, glTF) has no exact surfaces to cut again, so choose As shown. An open assembly is refused: use As shown, or open one part on its own.
- Before cutting, the window works out roughly what the cut would cost. A part with more than 50,000 faces, a face with more than about 20,000 points along its edges (a plate with hundreds of holes at Fine), or a result of more than 3,000,000 triangles is refused at once, in words. The deviation limits are worked out from the whole part, hidden bodies too.
- The cut stops after 30 seconds, and a result over 3,000,000 triangles is refused. Choose Coarse or a larger deviation. The 100 MB file limit applies as before.
- The deviation and angle are targets for the cutting, not a hard promise for every shape. On a cylinder they hold. On a ball a triangle can sit up to about twice the deviation below the surface, and corners up to a quarter wider apart than the angle. The volume of the written part always stays within the deviation times the surface area of the true part, and a little under it.
- If the modeling engine is busy with a change, wait for it to finish.
Limits
- One STL file can be at most 100 MB, which is about 2 million triangles in binary or about 490,000 in ASCII. A model may start with up to 3,000,000 triangles when a lower detail level brings it under the limit. Above these the window says so in words and Export stays off; hide or untick bodies, choose binary, or lower the detail.
- Triangles merged away by Reduced or Draft are counted separately from broken ones.
- Triangles with a missing or broken coordinate, or no area, are left out and the message says how many.
- With nothing shown or nothing ticked there is nothing to export, and the window says so.
Assemblies
With an assembly open, Export as STL... writes every shown component as one STL, placed where it sits in the assembly. Hide a component first to leave it out.
Step by Step: One Part From the Right-Click Menu
- Right-click the part.
- Point to Export in the menu (or click or tap it), then click Export this part as STL.
- The file downloads, named after the model and the part, ending in .stl, in binary, in the model's own units. A message gives the triangle count and the units.
Good to Know
- As shown works on any model, STEP or mesh. Coarse, Fine and Custom need a STEP part or a part modeled here.
- It needs the Advanced plan or higher, and on a share the Exports box. A view-only share without that box cannot export.
Common Mistakes and Messages
- "Export a part as STL on the Advanced plan or higher." STL export needs the Advanced plan or higher. Upgrade to export.
- "There is nothing to export: no body is shown. Show at least one body and try again." Every body is hidden. Show one in the Parts list, then open the window again.
- "No body is ticked. Tick at least one body to export." Tick at least one body in the window's list.
- "Building the STL took too long and was stopped. Choose a smaller detail level or fewer bodies." Pick Reduced or Draft under Detail, or untick some bodies.
- "The owner of this model has not allowed exports." The model was shared with you without the Exports box. Ask the sender to share it again with Exports (DXF, STEP, STL) ticked.
- The part is the wrong size in my slicer. STL files carry no units. Choose the same unit in Units as your slicer uses, or set the slicer to the unit you exported in.
- Export stays gray. The size line says why: the file would be over the limit. Choose binary, a lower Detail or a coarser Resolution, or untick bodies.