Thin Feature Walkthrough
A step by step example of Thin Feature: a bent wall made from two drawn lines, then a box made from a closed rectangle. For everything the option can do, see Thin Feature.
Before You Start
- Modeling comes with the Pro plans.
- The examples use inches. Use any unit you like, and type it after the number.
Make a Wall from a Line
- Open a sketch on the Top plane. Choose the Line tool and draw two lines in a row, one 3 in long and then one 2 in long at a right angle to it. Do not close the shape.
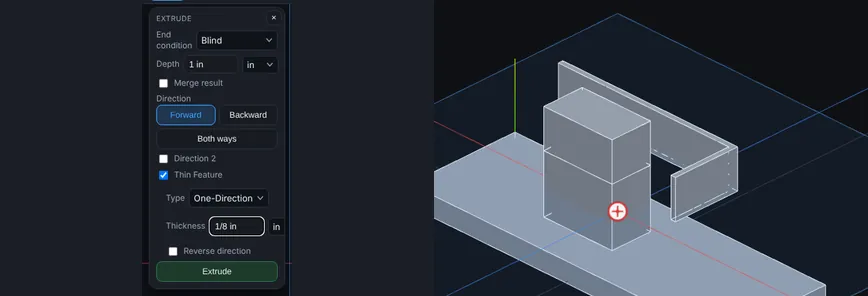
- On the Features tab, click Extrude. Set Depth to
1 in. - Tick Thin Feature. Leave Type on One-Direction and type
1/8 infor the thickness. - Click Extrude. A wall 1/8 in thick and 1 in tall follows both lines. The outside corner is sharp.
- The Model tree reads Extrude open line, 2 lines, 1 in, thin 1/8 in.
Put the Wall on the Other Side
- Right-click the step in the Model tree and choose Edit Feature.
- Tick Reverse direction. The wall moves to the other side of the lines.
- Change Type to Mid-Plane. The wall is now centred on the lines.
- Press Enter. The step reads thin 1/8 in mid-plane.
Make a Box Wall from a Rectangle
- Open a new sketch on the Top plane and draw a rectangle 3 in by 2 in.
- Click Extrude, set Depth to
1 inand tick Thin Feature. Type1/8 in. - Click Extrude. The wall grows inward, so the box keeps its 3 in by 2 in outside size.
- Edit the step and tick Reverse direction to grow the wall outward instead. The box is then 1/4 in longer and wider.
Tips
- Draw the line along the middle of the wall you want, and use Mid-Plane, to keep a wall centred on the drawing.
- Use Two-Direction with different thicknesses to put 1/8 in on one side and 1/4 in on the other.
- Press Esc, or click the X, to close the Edit Feature editor without a change.