Draft
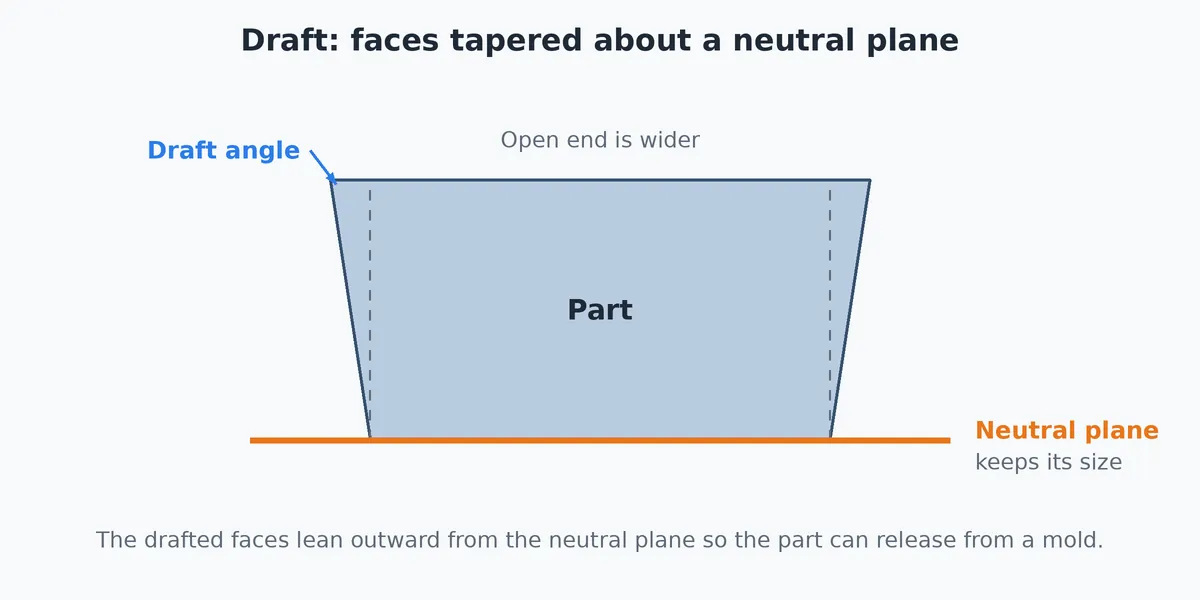
Draft tilts faces of a part by a small angle. It is the taper a molded or cast part needs so it can come out of its mold. It has two types:
- Neutral Plane: the faces you pick lean away from one flat face, which keeps its size.
- Parting Line: the faces above and below a line you pick (where the two halves of the mold meet) lean away from that line, each side by its own angle. The line itself stays put.
What you get: the faces you picked tilted by the draft angle, hinged on the neutral plane or the parting line, in one History step, with a message such as "Drafted 4 faces at 5 degrees." and the new volume.
When to Use It
- Add a release angle to the sides of a molded or cast part
- Taper the walls of a box so a stack of them nests together
- Taper one face of a part, such as a wedge or a ramp
- Add draft to every side of a part that stands on a flat base
- Taper both halves of a part that is molded in a two part mold, away from the line where the halves meet (Parting Line)
Step by Step
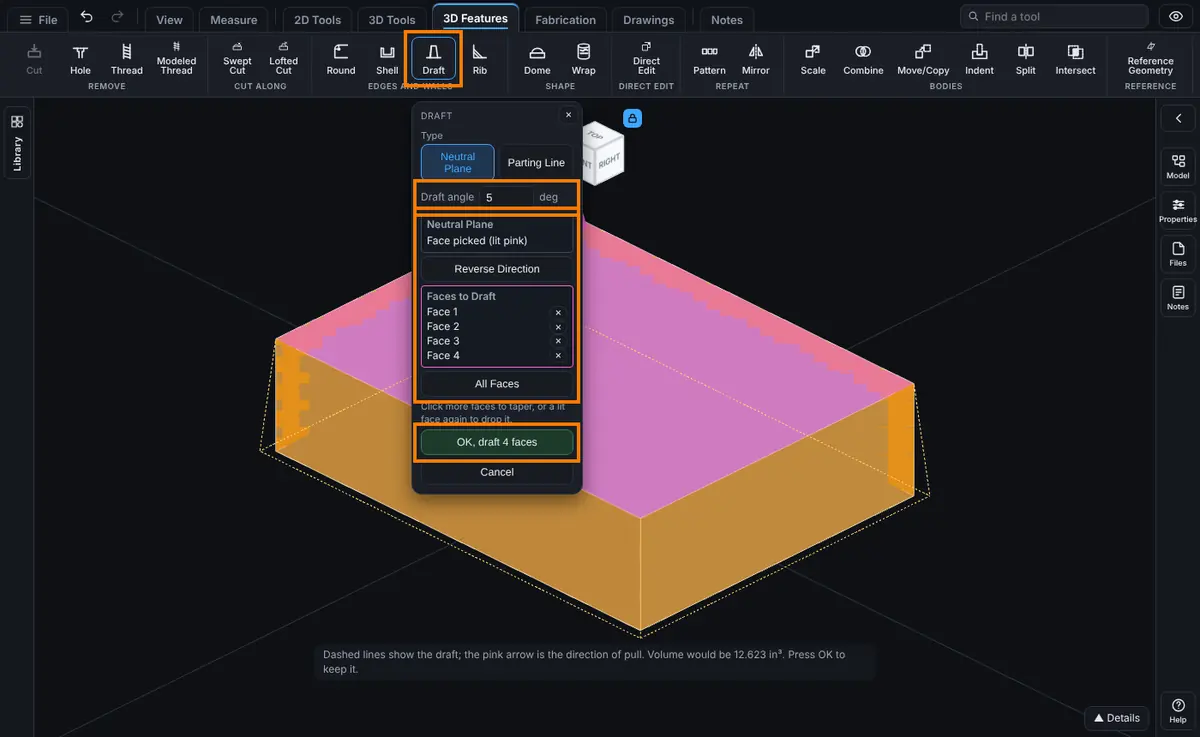
- Click Advanced on the Features tab, then Draft. Under Type, click Neutral Plane (it starts there). The panel shows two boxes: Neutral Plane and Faces to Draft.
- Type the Draft angle in degrees. It starts at 1 degree.
- Click a flat face of the part for the Neutral Plane. It is lit pink. It is the face the taper hinges on and it keeps its size.
- Click each face to taper. They are lit orange. Click a lit face again to drop it, or click the × beside it in the list. All Faces picks every face that meets the neutral plane at an angle, such as all the sides of a part standing on it.
- Look at the arrow on the neutral plane. It shows the direction of pull. Click Reverse Direction to turn it the other way.
- Watch the dashed preview of the new edges. Click OK. The button reads OK, draft 4 faces when four are picked.
Parting Line Draft, Step by Step
- Click Advanced on the Features tab, then Draft, then click Parting Line under Type. The panel shows two boxes: Direction of Pull and Parting Lines.
- Type the Draft angle for the faces above the parting line. Type the Other side angle for the faces below it, or leave it empty to use the same angle.
- Click a flat face of the part for the Direction of Pull, such as the top. It is lit pink. The mold pulls apart square to this face. The pink arrow in the preview shows the way; the side it points to is above. Click Reverse Direction to turn it round.
- Click the parting edges, the level line where the two halves of the mold meet. The part's edges show in blue; each edge you click is lit orange. Click a lit edge again to drop it, or click the × beside it in the list. Clear parting lines drops them all.
- Choose Both sides, Above only or Below only.
- Watch the dashed preview. Click OK. The button reads OK, draft at 4 parting edges when four are picked.
The faces above the edges lean in as they go up, and the faces below lean in as they go down, both hinged on the parting edge. A 1.6 in tall block split at its middle and drafted 3 degrees on both sides is exactly as wide as before at the parting line, and about 0.04 in (1.05 mm) narrower on each side at the top and at the bottom.
Options
- Type: Neutral Plane or Parting Line. Changing it keeps the flat face you picked and drops the other picks.
- Draft angle: more than 0 and less than 90 degrees.
- Neutral Plane: a flat face. The first click on the part fills this box. Clicking either box in the panel tells the panel which box the next click fills.
- Faces to Draft: one or more faces. A face cannot be both the neutral plane and a face to draft.
- All Faces: adds every face that meets the neutral plane at an angle.
- Reverse Direction: turns the direction of pull the other way. The direction starts as the neutral face's outward direction.
- Direction of Pull (Parting Line): a flat face. The pull runs square out of it.
- Parting Lines (Parting Line): one or more edges, all at one height along the pull, at most 400.
- Other side angle (Parting Line): more than 0 and less than 90 degrees, or empty for the same as the Draft angle.
- Both sides, Above only, Below only (Parting Line): which faces lean. Above is the side the arrow points to.
- OK and Cancel: keep the draft, or leave without making it.
Edit It Later
Right-click the step in the Model tree and choose Edit Feature. You can change the Draft angle and Reverse Direction in place without picking the faces again. For a Parting Line draft you can also change the Other side angle and Both sides, Above only or Below only. The step is named Draft, such as Draft, parting line, 4 edges, 3 degrees above and 5 below.
Tips and What to Expect
- Pick the neutral plane first. The panel starts on Neutral Plane and moves on to the faces by itself once it has one.
- A 4 in tall box drafted 2 degrees on its four sides is about 0.14 in wider at the open end than at the neutral plane, on each side.
- A face that is parallel to the pull direction drafts cleanly. A curved face that turns too far can fail.
- A draft works on one body at a time.
- To taper the walls of a new boss or cut while you make it, tick Draft in the Extrude and Cut panel instead.
- The faces stay picked after a refused draft, so you can change the angle and try again.
- Parting Line works when the faces on each side already meet at the parting edges, such as a block built from two extrusions, one up and one down from the same sketch.
- A face that lies flat at the parting height (the top of a ledge) is left as it is.
- Step Draft (a parting line that steps up or down across a face) is not offered. The modeling kernel cannot tilt two halves of one face about two heights. Draft each level as its own Parting Line step where the faces allow it.
Common Mistakes and Messages
- "Type a draft angle more than 0 and less than 90 degrees."
- "Pick the neutral plane first." and "Pick at least one face to draft."
- "No face meets that neutral plane at an angle, so there is nothing to draft from it." All Faces found nothing. Pick faces by hand, or pick a different neutral plane.
- "That draft could not be built: at least one of the faces cannot taper at 5 degrees about this neutral plane..." Try a smaller angle, fewer faces, or Reverse Direction.
- "The neutral plane face of this draft no longer exists on the part." An earlier step changed or removed it. Edit the draft and pick it again.
- "A draft works on one body at a time." Draft each body as its own step.
- "Pick at least one parting edge: the line where the two halves of the mold meet."
- "These parting edges lie at 2 different heights along the pull." A Parting Line draft needs every edge at one height. Pick the edges of one level, or pick another Direction of Pull.
- "Parting edge 1 climbs along the direction of pull." or "Parting edge 1 runs along the direction of pull, so the parting line steps there..." Pick edges that run level, square to the pull.
- "There is no face above those parting edges to draft." Choose the other side, Both sides, or Reverse Direction.
- "None of the faces beside those parting edges can be drafted: they lie flat at the parting height."
- "A face beside parting edge 1 runs both above and below the parting line..." Pick edges that split the part into a half above and a half below.
- "That Parting Line draft could not be built..." The faces would pass through each other. Try a smaller angle or fewer edges.
- "Other side angle: type an angle more than 0 and less than 90 degrees, or leave it empty."