Linear Component Pattern
Makes copies of one or more components in a straight line, or in a grid, with an even gap between them. Use it for a row of bolts, a rack of shelves or a grid of feet. The copies follow the original. Assemblies need the Pro plan.
What you get: copies of the seed in a row (or a grid) at the spacing you type, shown in the view and listed in the Model tree as LocalLPattern1; the copies follow the seed when it moves.
When to Use It
- Place the same bolt along a rail at a fixed spacing
- Fill a plate with a grid of posts
- Leave one or two places in a row empty
Step by Step
- Open an assembly with at least one component (see Assemblies: Start and Insert Parts).
- Pick the component to repeat. This original is called the seed. Then open the window in any of these ways:
- Click Linear Pattern in the Patterns group of the Features tab.
- Click the Assembly tab, then Linear Pattern (Patterns group).
- Right-click the component, then choose Assembly tools, Linear Component Pattern... (the picked component is the seed).
- Right-click the assembly row in the Model tree and choose Linear Component Pattern...
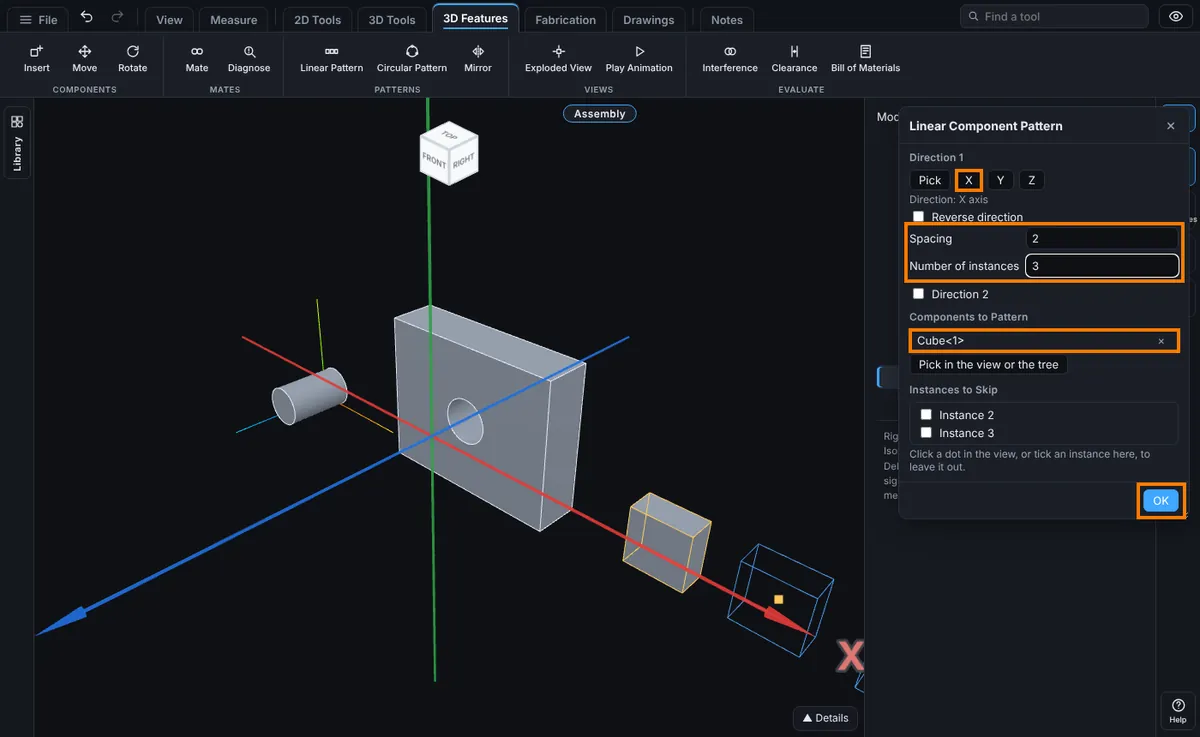
- The Linear Component Pattern window opens. The component you picked is already under Components to Pattern, such as Cube<1>. To add more, click Pick in the view or the tree, then click components in the view or in the Model tree. Each one joins the list. Click the x beside a name to take it out.
- Under Direction 1, click X, Y or Z, or click Pick and then click a straight edge, a round face, a flat face or an axis. The line under the buttons shows the direction in use, for example "Direction: X axis".
- Type the Spacing (the distance between neighbours, a unit such as 2 or 1 1/2 works) and the Number of instances, for example 2 and 3.
- Watch the preview: blue boxes show every copy. Tick Reverse direction if they go the wrong way.
- Click OK. A message counts the copies made, not the seed: for 3 instances it reads "Made LocalLPattern1: 2 instances." The pattern shows in the Model tree as LocalLPattern1 with the same count.
Options
| Option | What it does |
|---|---|
| Components to Pattern | The seeds. Up to 50. Each seed is repeated. |
| Pick in the view or the tree | Turns on picking: click a component in the view or the tree to add it. |
| Direction 1: Pick, X, Y, Z | Sets the line the copies run along. Picking an edge or face makes the direction follow that component when it moves. |
| Reverse direction | Runs the copies the opposite way. |
| Spacing | Distance from one copy to the next. It starts at 1.25 times the size of the seed. |
| Number of instances | How many in the row, counting the seed. From 2 to 200. It starts at 3. |
| Direction 2 | Tick it to add a second direction and make a grid. It has its own Pick, X, Y, Z, Reverse direction, Spacing and Number of instances. |
| Pattern seed only | With Direction 2 ticked: repeats only the seed in direction 2, not the whole row made in direction 1. |
| Instances to Skip | Leaves chosen copies out. See below. |
| OK | Makes the pattern. |
Skipping Instances
Under Instances to Skip, tick a copy in the list to leave it out. You can also click its dot in the view. A yellow dot is kept and a red dot is skipped. The list reads "Instance 2, Instance 3" for a single row, or "Row 2, column 3" for a grid. The seed itself can't be skipped.
Change It Later
Double-click the pattern in the Model tree, or right-click it and choose Edit Feature. The window opens with your settings. Right-click also offers Dissolve Pattern (the copies become ordinary components) and Delete (you choose Keep Instances or Delete Instances Too).
Tips
- Copies follow the seed. Move the seed and every copy moves with it. A copy can't be moved, fixed, replaced or deleted on its own.
- Copies count in the Bill of Materials, mass, section view and interference checks.
- Limits: 30 patterns per assembly, 300 copies for one seed and 500 copies in all.
- Ctrl+Z undoes making, editing, dissolving and deleting a pattern in one step.
Common Mistakes and Messages
- "Insert a component first." The assembly is empty.
- "The assembly is exploded. Collapse it first." Collapse the exploded view, then open the pattern window.
- "Pick one or more components to pattern first." The list is empty.
- "Type a spacing above zero, such as 2 or 1 1/2." The Spacing box can't be read.
- "Type a number of instances from 2 to 200." Fix the count.
- "That would make 600 instances. The most is 500." The counts multiply: 30 in Direction 1 and 20 in Direction 2 make 600. Lower the counts or use fewer seeds.
- "An assembly can hold up to 30 patterns." Delete or dissolve one first.
- "That is an instance of a pattern. Pick its seed." You picked a copy. Pick the original.
- "Close the Component Pattern window first." Finish with OK, or close the window, before you delete or dissolve a pattern.