Equations Walkthrough
A step by step example of making one dimension follow another, from the first number to the Equations window. It uses two lines, so you can do it in a minute. For everything a formula can hold, see Equations.
Before You Start
- Sketching is part of modeling, which comes with the Pro plans.
- Open a sketch on a plane (see Planes and Faces) and draw two lines, one above the other, with the Line tool on the Sketch tab.
- The examples use inches. Use any unit you like, and type it after the number.
Name the First Dimension
- Click Dimension on the Sketch tab.
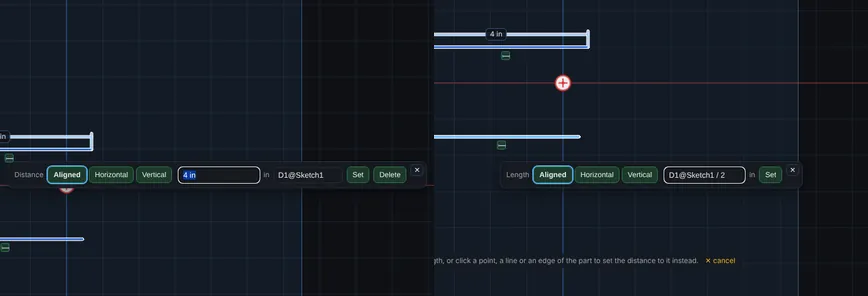
- Click the upper line. A box opens with Length and the three buttons Aligned, Horizontal and Vertical.
- Type
4 inand press Enter. The line becomes 4 in long. - Click the number on the sketch. The box opens again, and this time it also shows the dimension's name,
D1@Sketch1, after the number. That is the name a formula uses. - Press Esc to close the box.
Make the Second Dimension Follow
- Click Dimension, then click the lower line.
- In the box, type
D1@Sketch1 / 2instead of a number. The name is the one you just saw. You can type it in small letters too. - Press Enter. The lower line becomes 2 in long, half the first.
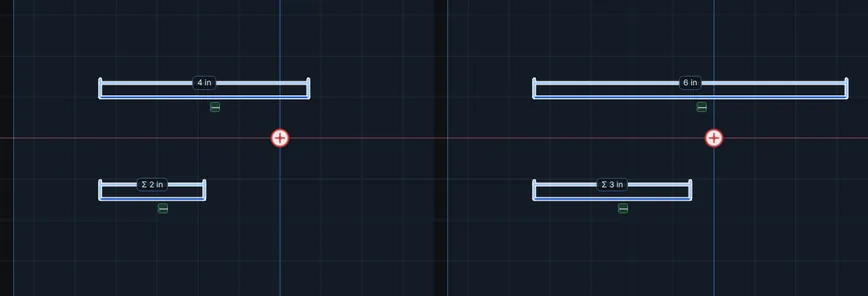
- Look at its number on the sketch. It starts with Σ, the sigma sign. That marks a dimension a formula drives. Hover over it to see its name and formula.
Change the First and Watch the Second
- Click the number on the first line, type
6 inand press Enter. - The first line is 6 in. The second line follows to 3 in, with no typing from you.
- Press Ctrl+Z. Both lines go back to 4 in and 2 in in one step. Press Ctrl+Y to bring 6 in and 3 in back.
- Try a number that does not work, such as
0for the first line. It is refused with a message, and nothing changes.
Use the Equations Window
- On the Sketch tab, click Edit, then Equations.... A window opens at the right of the sketch.
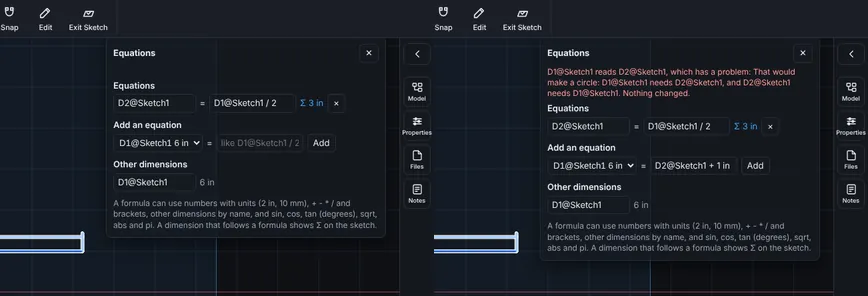
- Under Equations you see
D2@Sketch1, its formulaD1@Sketch1 / 2and its value now, 3 in, with the Σ mark. Under Other dimensions you seeD1@Sketch1. - Try to make a circle. Under Add an equation, pick
D1@Sketch1, typeD2@Sketch1 + 1 inand click Add. D2 already reads D1, so D1 cannot read D2. A red message says so by name, ends with Nothing changed, and the sketch is as it was. - Change the formula of D2. Click in its formula box, type
D1@Sketch1 / 3and press Enter. The second line follows to 2 in, and the message says the equation changed. - Delete the equation. Click the × in the row of D2. The line keeps its length, 2 in, and D2 moves down to Other dimensions as a plain dimension.
- Press Ctrl+Z to put the equation back. Click the ✕ at the top of the window to close it.
Rename and Use the Name
- In the Equations window, click the name
D1@Sketch1, typeWidthand press Enter. Or click the number on the sketch, and rename it in the box. - The formula of D2 now reads
Width / 3. Formulas that used the old name follow the new one. - A name uses letters, digits and the underscore.
Widthworks.Slot Depthdoes not, because of the space.
Use It in an Extrude
- Use a sketch with a closed shape, such as a rectangle with one side dimensioned
4 in, which is namedD1@Sketch1. - Click Extrude on the Features tab. In the Depth box, type a formula that uses a dimension's name, such as
D1@Sketch1 / 4. The names of the sketch you just drew work in the depth box. - The depth is 1 in. It is worked out once, when you press Extrude or Cut, and stays a number after that. It does not follow later changes.
Options
- Dimension box: a number or a formula, when you place a dimension or click its number.
- Equations window: add, change, delete and rename.
- Extrude depth: a formula, worked out once.
Tips and What to Expect
- A circle, a name that is not there and a mistake in the formula are each refused with a plain sentence, and nothing changes.
- Typing a plain number over a driven dimension ends its equation. The message says so.
- Everything here is saved with the sketch, and each change is one Undo step.