Scale
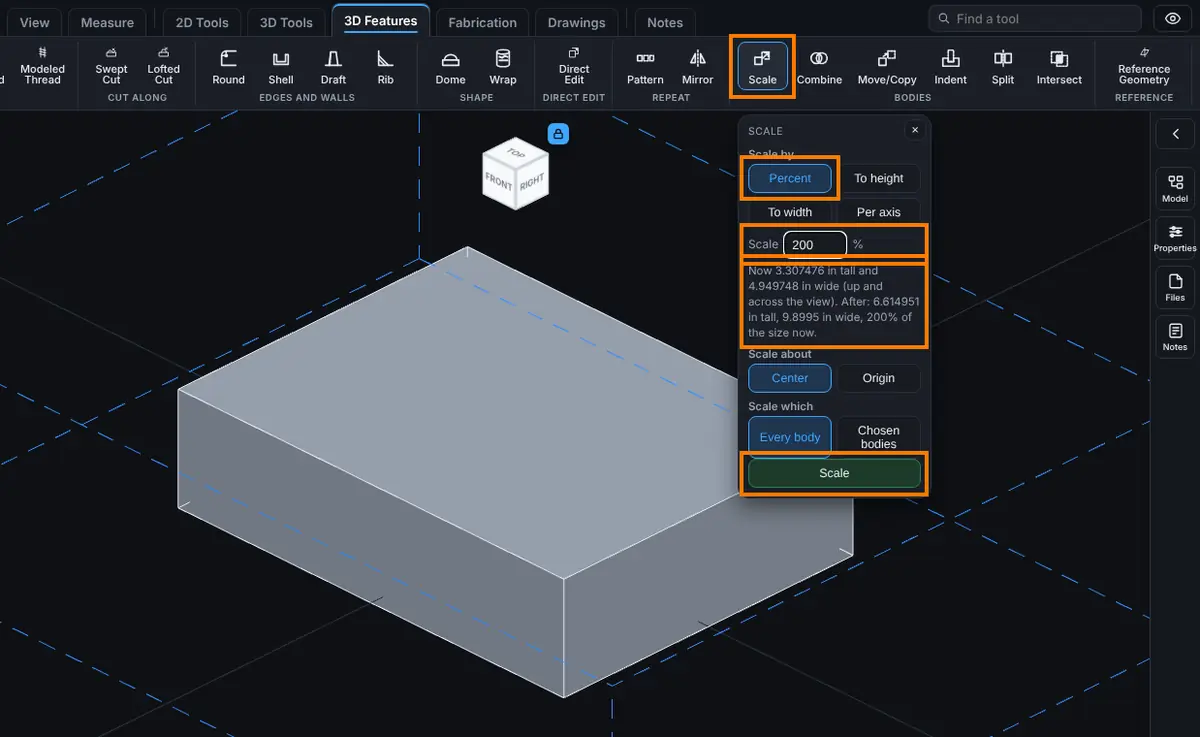
Scale makes bodies larger or smaller. By default every dimension changes by the same factor, and every body in the model is scaled. You can also scale X, Y and Z by different amounts (Per axis), and you can scale only the bodies you choose (Chosen bodies). It works on a model with no feature history too, such as a STEP file you just opened, because it needs no sketch.
What you get: the bodies made larger or smaller by the factor you chose, as one Scale step in the Model tree, with the new volume of the part shown.
When to Use It
- Fix a model that arrived at the wrong size, such as a part drawn in inches that opened as millimeters
- Make a part to a different size without redrawing it
- Make a part a given height or width and let the other sizes follow
- Stretch a part in one direction only, such as a 12 in bracket made 18 in long with the same width and thickness
- Resize one body of a part and leave the others as they are
- Make a scale model for display
Step by Step
- Click Advanced on the Features tab, then Scale.
- Under Scale by choose Percent, To height, To width or Per axis.
- Type the value. For Percent, 200 is twice the size and 50 is half. For To height or To width type the size you want the part to measure. For Per axis type a percentage in each of the X, Y and Z boxes.
- Read the line under the boxes. It shows the size now and what it will be after, tall and wide as you see the part up and across the view. If it names a problem instead, the Scale button stays grey until you fix it.
- Under Scale about choose Center or Origin.
- Under Scale which choose Every body or Chosen bodies. With Chosen bodies, tick the bodies in the list, or click them in the view. Click a body again to drop it.
- Look at the dashed box in the view. It shows the new size before you apply.
- Click Scale. A message such as Scaled to 200% or Scaled X 150%, Y 100%, Z 100% appears, with the new volume of the part.
For example, a block 4 in by 3 in by 1 in (12 cubic in) scaled by Percent 200 about the Center becomes 8 in by 6 in by 2 in, and the message says "Scaled to 200%. Volume is now 96.000 in³.": eight times the volume.
Options
- Percent: a percentage of the size it is now. It starts at 100.
- To height: scale so the part is this tall, up the view as it is turned right now. Its other sizes follow in proportion. Type any unit, such as
6 inor150mm. - To width: scale so the part is this wide, across the view as it is turned right now.
- Per axis: a separate percentage along X, Y and Z of the model. 150, 100, 100 makes the part half as long again along X and leaves Y and Z alone. Each box takes 0.1 to 100000 percent. 100 leaves that direction as it is.
- Center: the middle of the bodies being scaled (their centroid) stays where it is. They grow or shrink evenly all round it. This is the starting choice.
- Origin: the origin stays put, and everything moves toward it or away from it.
- Every body: the whole model is scaled. This is the starting choice.
- Chosen bodies: only the ticked bodies are scaled. The others stay exactly where and as they are. The list shows the first 60 bodies; click a body in the view to choose one further down. The Scale button stays off until at least one body is chosen.
"Up" and "across" follow the view, and the readout follows it as you turn the view. Per axis always uses the model's own X, Y and Z, whichever way the view is turned.
Edit It Later
Right-click the step in the Model tree and choose Edit Feature. For a Percent, To height or To width step you can change how it scales, the value, and About the center or About the origin. For a Per axis step you get the three boxes X, Y and Z and the same two About choices. The bodies a step was made for stay the ones it names. The step is named Scale and sits after whatever it acted on. For a model that was just opened, it sits after Imported. Its line in History names the bodies, such as Scale Bracket X 150%, Y 100%, Z 100%, about the center.
Tips and What to Expect
- A part 4 in tall scaled to 200% becomes 8 in tall. The same part scaled To height 6 in becomes 150%, and its width grows by the same factor.
- A plate 10 in by 4 in by 1/4 in scaled Per axis X 150, Y 100, Z 100 becomes 15 in by 4 in by 1/4 in, and its volume grows by half.
- The volume always changes by the three factors multiplied together: 200% on all three is eight times the volume, X 150 and Y 50 with Z 100 leaves it at 75%. Every Scale step is checked this way on the real solid before it is kept.
- Fillets, holes and cosmetic threads scale with everything else. Per axis with unequal factors turns a round hole into an oval one, as it should.
- The factor has to stay between 1/1000 and 1000 times the size now.
- With unequal Per axis factors, round faces become free form faces. The shape is exact, but the volume and weight the viewer shows for such a body can be off by up to about 1 percent. Flat faced parts such as plate and bar are not affected.
- Undo takes a scale back exactly.
Common Mistakes and Messages
The first five show in the line under the boxes, and the Scale button stays grey until you fix them.
- "That is too far from the size it has." The size or percentage you typed is more than 1000 times, or less than a thousandth of, the size now. Type a value nearer the size it has.
- "Choose the bodies to scale: tick them in the list, or click them in the view. Or choose Every body." Chosen bodies is on and nothing is ticked. Tick a body, or choose Every body.
- "Type a percentage more than 0." A percentage of zero or less is refused.
- "The X scale must be from 0.1 to 100000 percent." Per axis has the same limits in each box. Type a percentage with no minus sign. To flip a part, use Mirror instead.
- "All three are 100 percent, so nothing would change. Type another percentage." Type another percentage in at least one box.
- "That is more than 1000 times the part. Type a size nearer the one it has." This comes if you press Enter in the box with a size that far off. The same message says less than a thousandth of for a size that is too small.
- "This step names a body (Bracket) that no longer exists in that shape. An earlier step probably changed it." The name in brackets is the body. An earlier step changed or removed a body this Scale step was made for. Edit or delete the Scale step, and choose the bodies again.
- "The kernel could not make a sound body when scaling Bracket that way, so the step was refused. Try factors nearer each other." The name is the body. Try factors nearer each other.
- "The scale took longer than 30 seconds, so it was stopped and the part left as it was. Try it on fewer bodies." Scale fewer bodies at a time. A saved model reopening gets ten minutes for the same step.
- The readout says "Measuring the part...". Wait a moment, or turn the view. The Scale button stays off until the part is measured.
- "Open the model for modeling first."